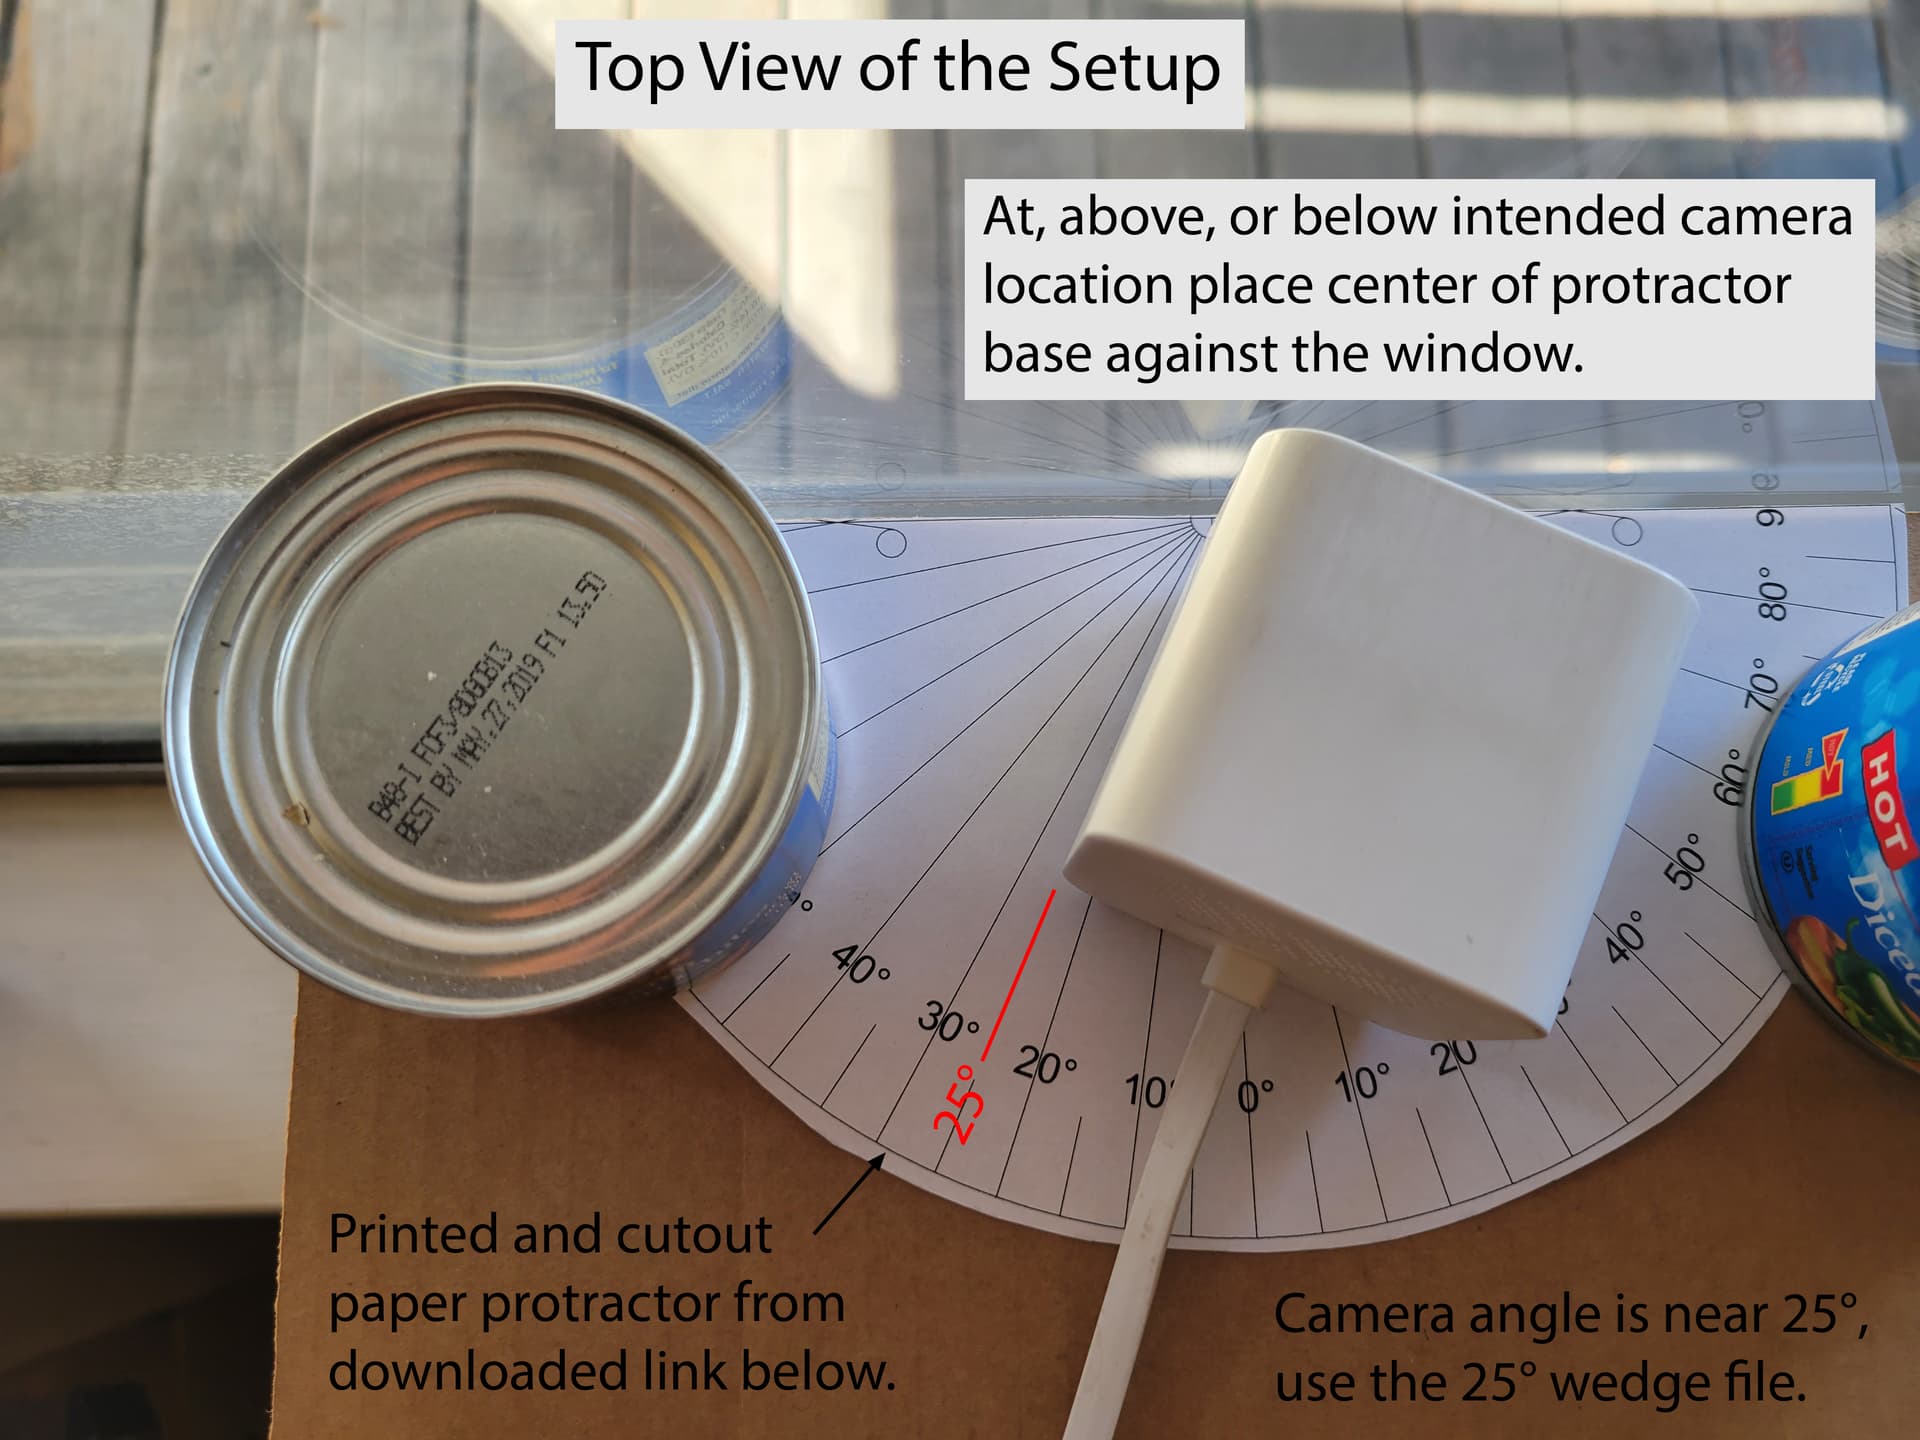
Here is the link for the protractor PDF file: Aiming Protractor.pdf at no cost to you.
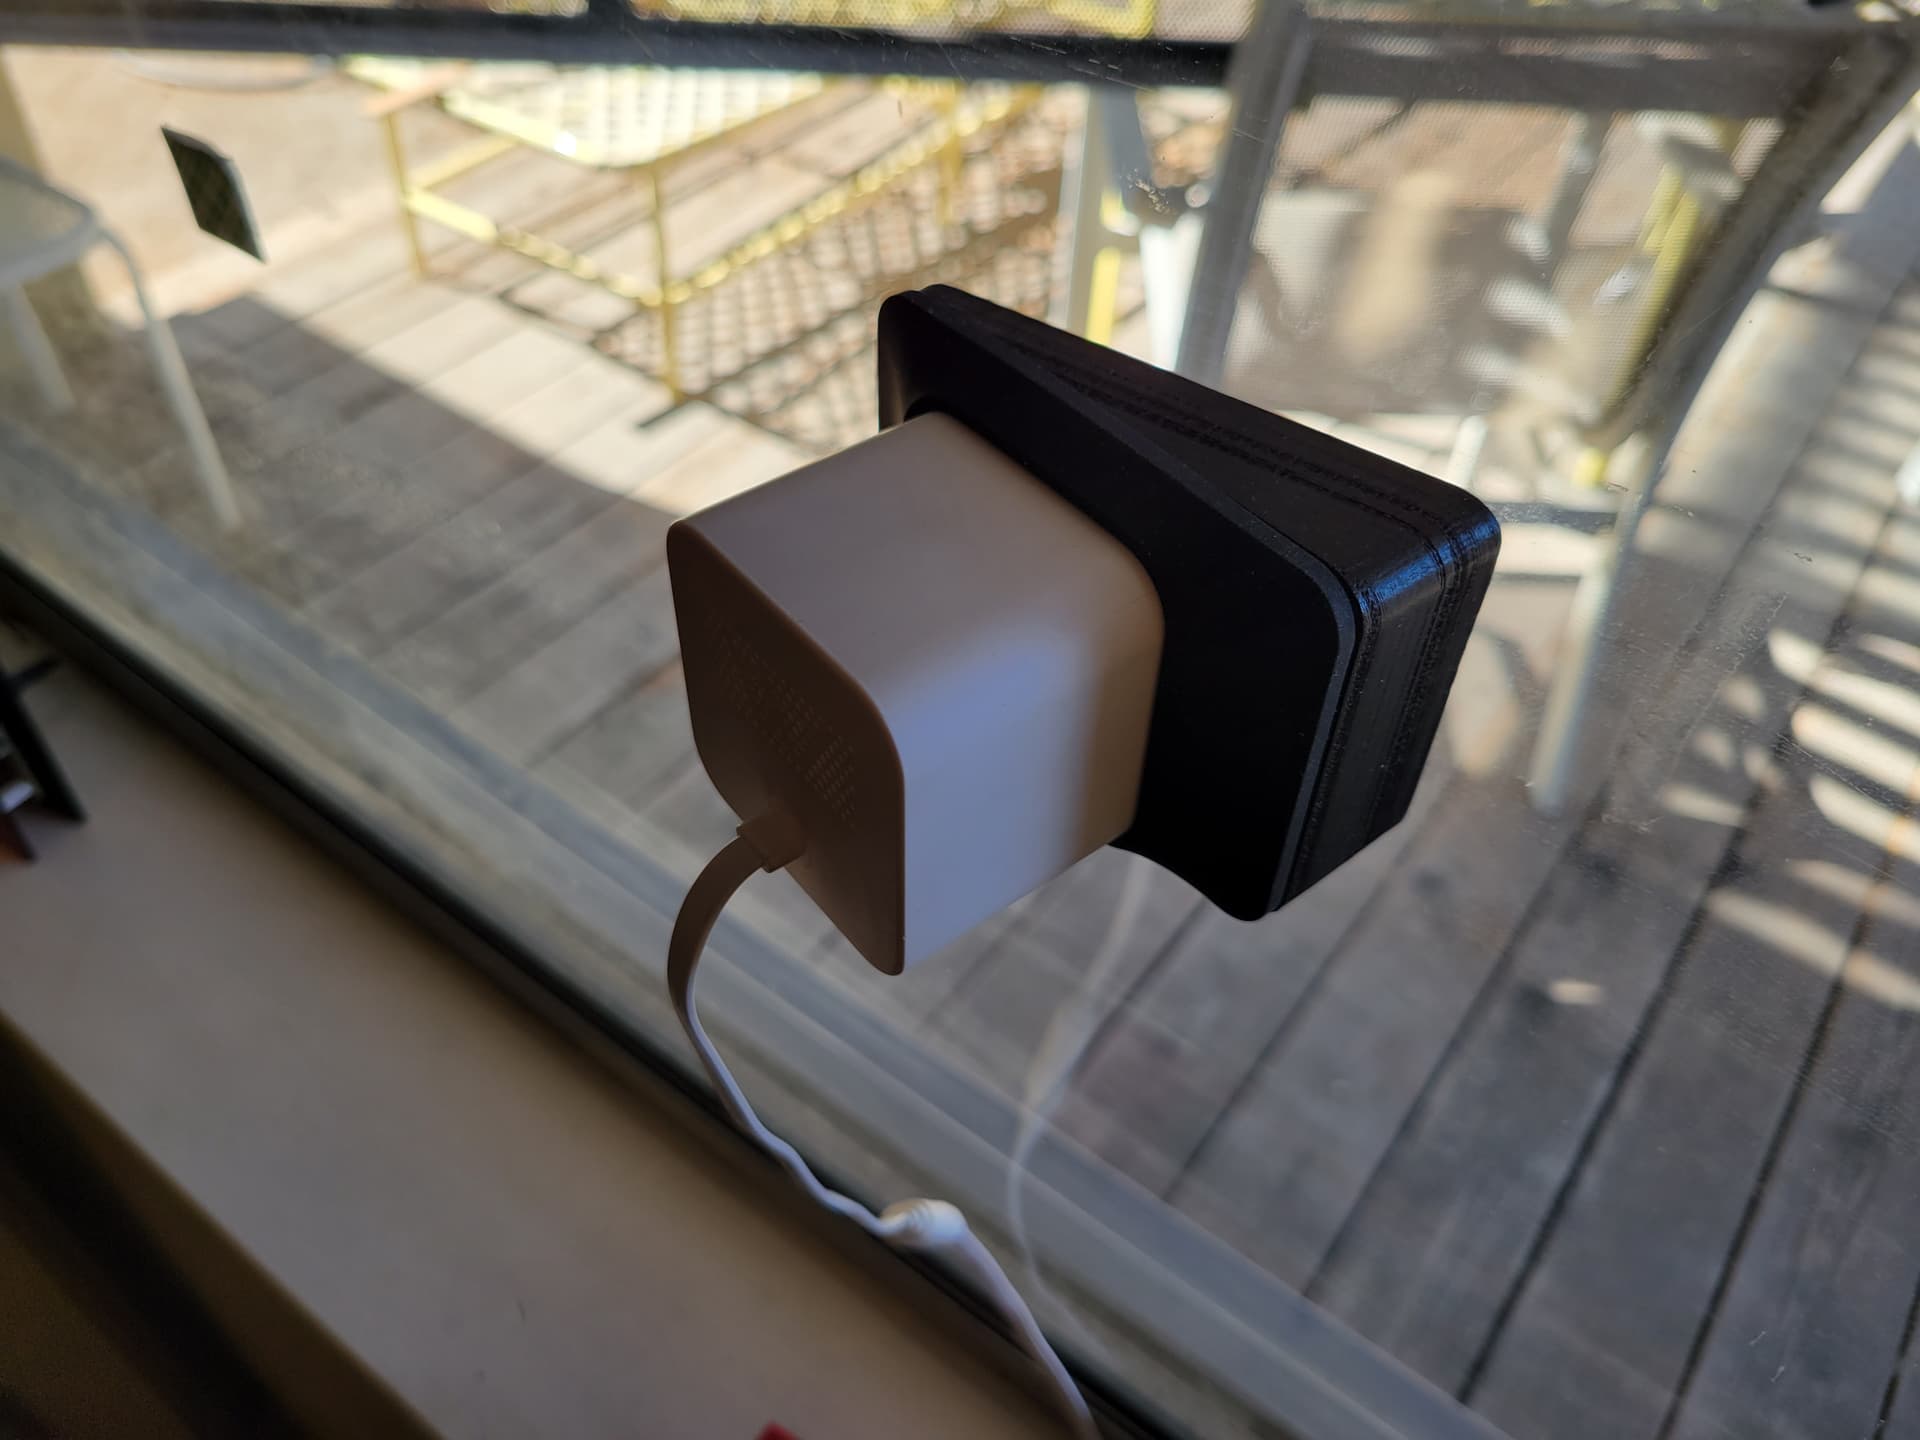
This is the live view of the camera on the aiming stand. In this image, the white area at the low right corner is the end of the protractor and some of its reflection. The slightly curved strip of dark gray at the right edge of the image is the outside window trim.
The camera at this location can view a person from head to toe. For those who shy away from extremely complicated things and succumb to laziness, I encourage you to enlist family or friends to help. You can support each other as progress is made. LOL
You do amazing and extremely valuable work Victor. What you share and contribute to the community with this is most appreciated. I look forward to see what other things you come up with in the future too!
Hello People
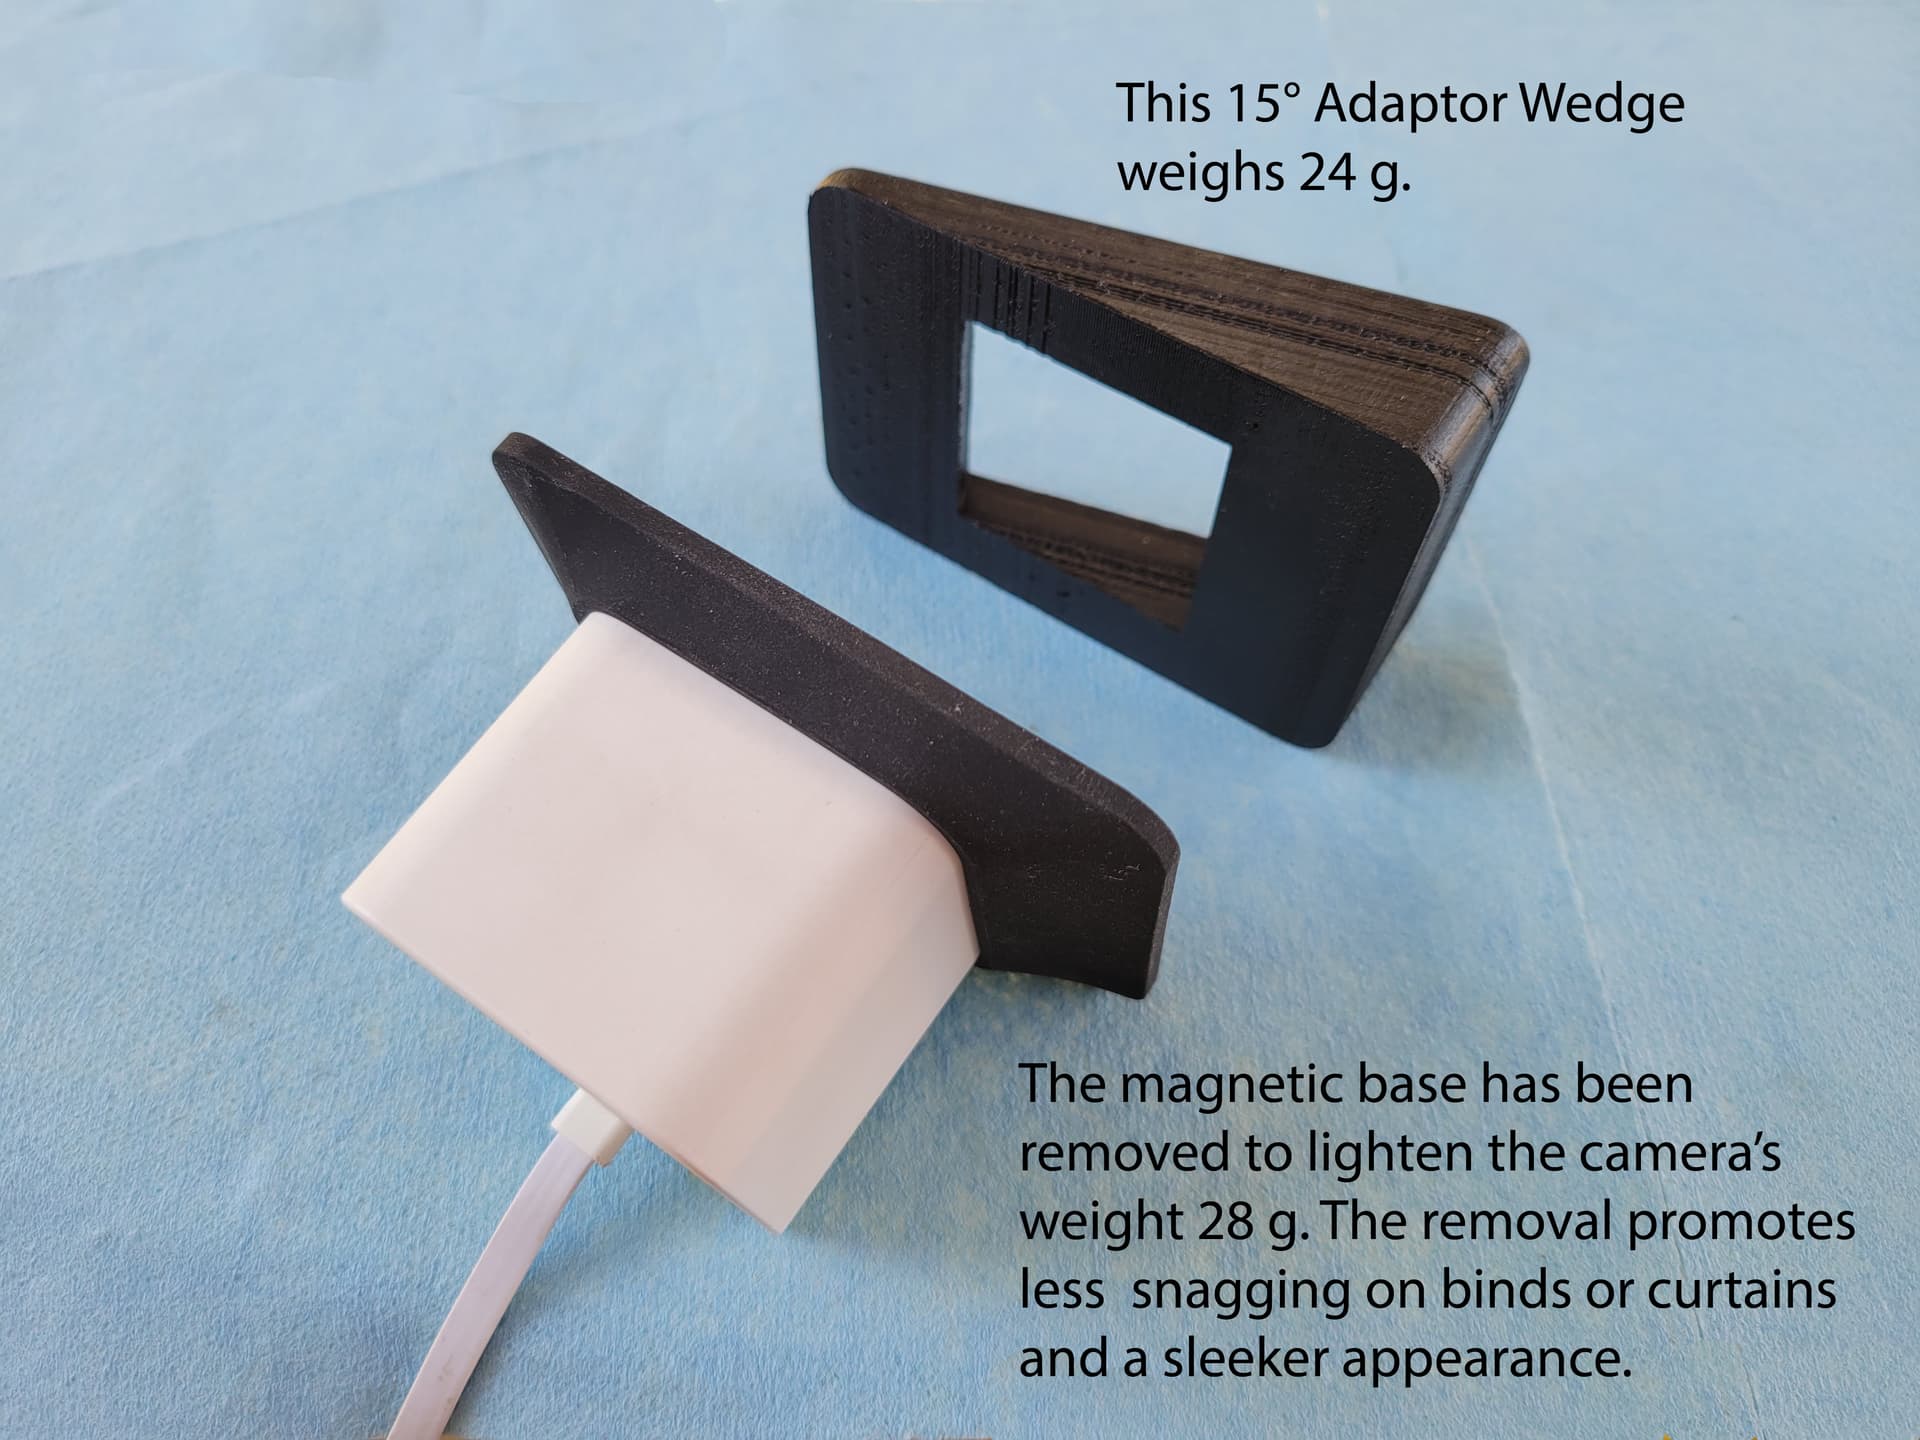
I sent out the file: Wyze Window Wedge 15°.stl, to my local library for printing. I received it yesterday (no cost to me) and set it up today.
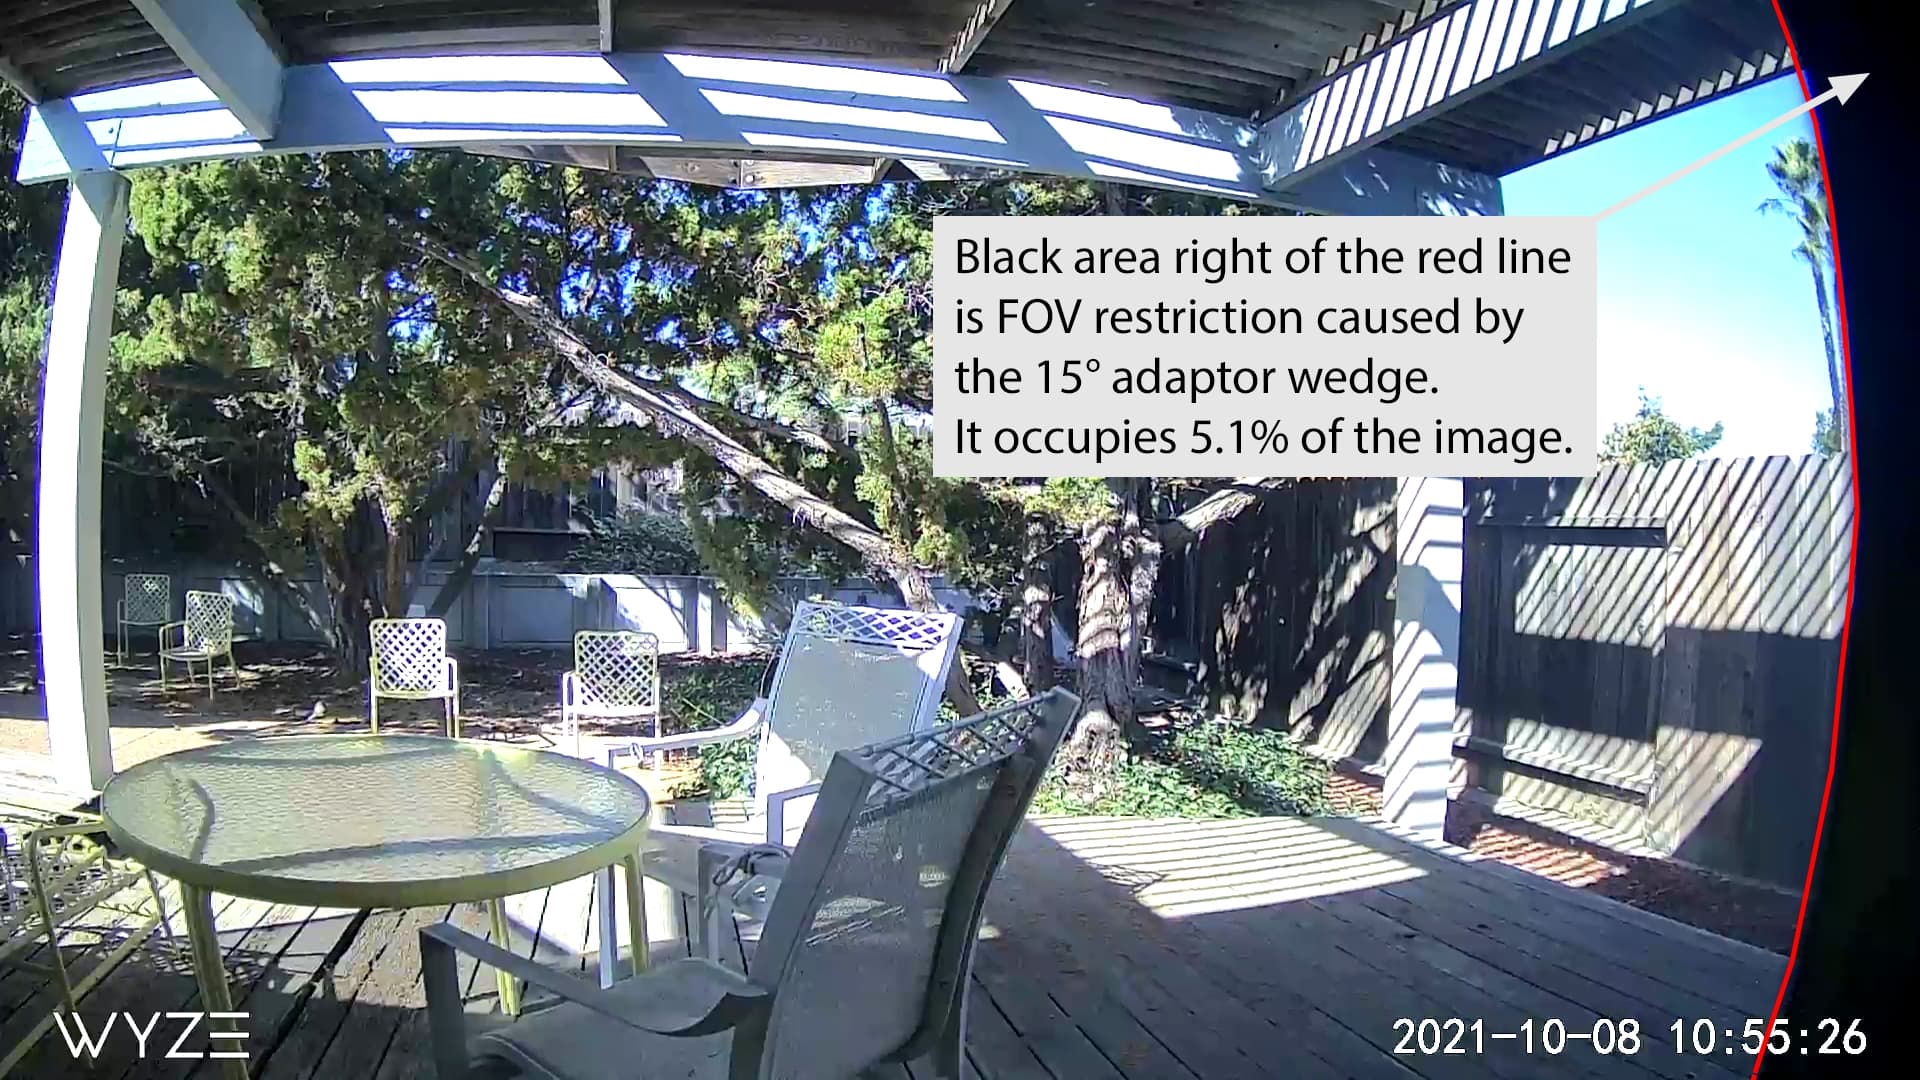
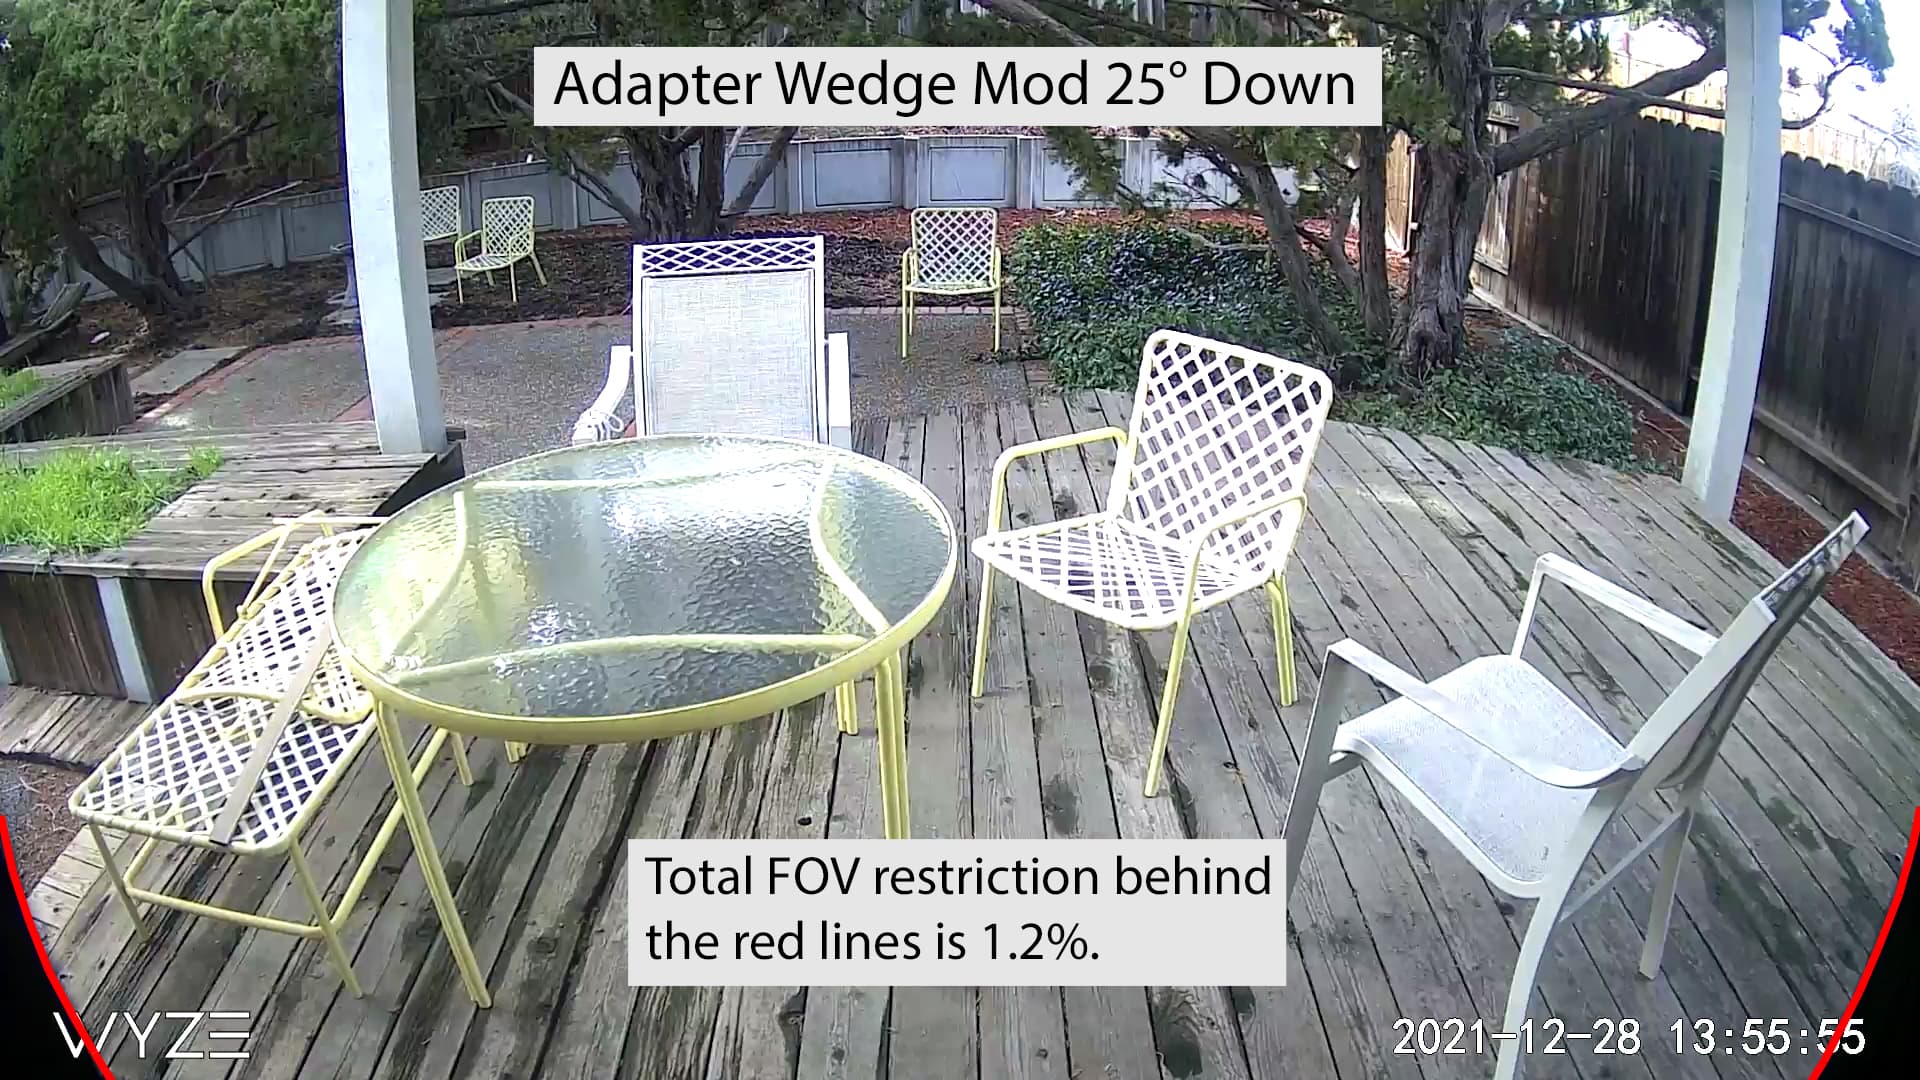
I calculated the VOF (Field Of View) restriction in the previous post at 11.8% but the actual measurement of the restriction, based on pixels of a through-the-lens image is 5.1%. This is pleasantly better than I expected. I had the camera too far back from the window in my calculation. Only after receiving a real Wyze Window Mount could I actually measure what I had assumed from picture scaling earlier. I got the corner radii values right though, they match up nicely.
Here is a link to Window Mount Horizontal Aiming Wedges 5° to 25° at 5° intervala]s, Beyond 25° horizontally the FOV restriction increases dramatically:
Wait, WHAT?!?! Local libraries have 3D printers and you can use them (within reasonable limits I assume) at no cost? I have never heard of this before, but it sounds AMAZING! I hope my library does something like this. Can you elaborate on how that all work for your library? I have been dying to 3D print some accessories for some of my Wyze devices (make light switches out of contact sensors, or mounts for my motion sensors, etc), and if I can do this through my library (even if I have to pay for the cost of the supplies) that would be amazing! How exactly does that work for your library?
Google your local county library. Most allow you to do 1 print per week, .stl file format, max project size around 6"x6"x6" and X hours max print duration (mine limits duration to 5 hours). If you’re adamant about color, load your .stl on your phone, drive to the library, check color, if it’s what you want, upload file.
Hello @carverofchoice, @Seapup has given you what I did when I got wind of libraries doing 3D prints.
I will describe some of my experiences with library 3D printing. The first library was in a city where I visit my brother for a week at a time. I signed up for a library card (no charge) and emailed the STL file for a small project. Before sending the file I used a slicer program to check the integrity of the file and the time to print (not to exceed 4 hours and no larger than 5"x5") There was also a limit of one item per month. There are many slicer programs out there. I asked the librarian what printer and slicer program they use, I downloaded Cura for free and knew exactly what the librarian will see when she loads my file to be printed.
I asked her what if my project was a little over 5", could I orient it diagonally?
She said the machine prints much larger than that and in my case would not be an issue (because I’m an adult?). A day later an email arrived saying my print was ready and I picked it up and told her how nice it came out. And she said if you need something else printed send in the file. So I sent in another file that I wanted in white with black as an alternate color. She called to inform me that they were low on the white filament and would be doing it in black. I got the print the day after.
When I got home from my brother’s place I sent three rolls of filament in red, white, and blue to the library. Since then they have printed projects up to 10 hours long. But I also explained that these are proof prints to check before making the STL files available to the forum for free.
The second library is near my permanent residence. I was printing v3 related glare shields and dogleg support brackets. I told her these files are for the forum and that if she had a need for any of the files - go for it. I would send her pictures of completed installations using her prints. Also, showed her the Wyze app and the images from the v3 cameras. I get good service at this library also. There was no charge for filament or time for the prints at either library.
Sorry to hear that carverofchoice, I just edited my response to you to inform you that there was no charge to me for any of the prints at either library.
After receiving my 3D print of the 15° adaptor wedge for the Wyze Window Mount, I realized the print could be modified to use less filament, have less VOF restrictions while keeping the same outer geometry. I have since modified the Wize Window Wedge files that I have previously provided links to. The links will now get you the updated files.
Do you have a friend in another county that may be able to help?
It’s okay, I’ll eventually buy my own 3D printer, and for now, my brother has one I can use for a lot of things like this. His can’t do things like print things that swing with hinges or whatever (like printing something to turn contact sensors into swinging light switches), but enough to get by, so it’s not too big of a deal like I said as I will be able to print things similar to these window mounts just fine on his printer. It just would’ve been awesome to do it for free at the library! Consider me jealous…and now going to push my library to go get one! I found one county in my state that has one. They just charge per gram used plus a small maintenance fee. That’s reasonable though.
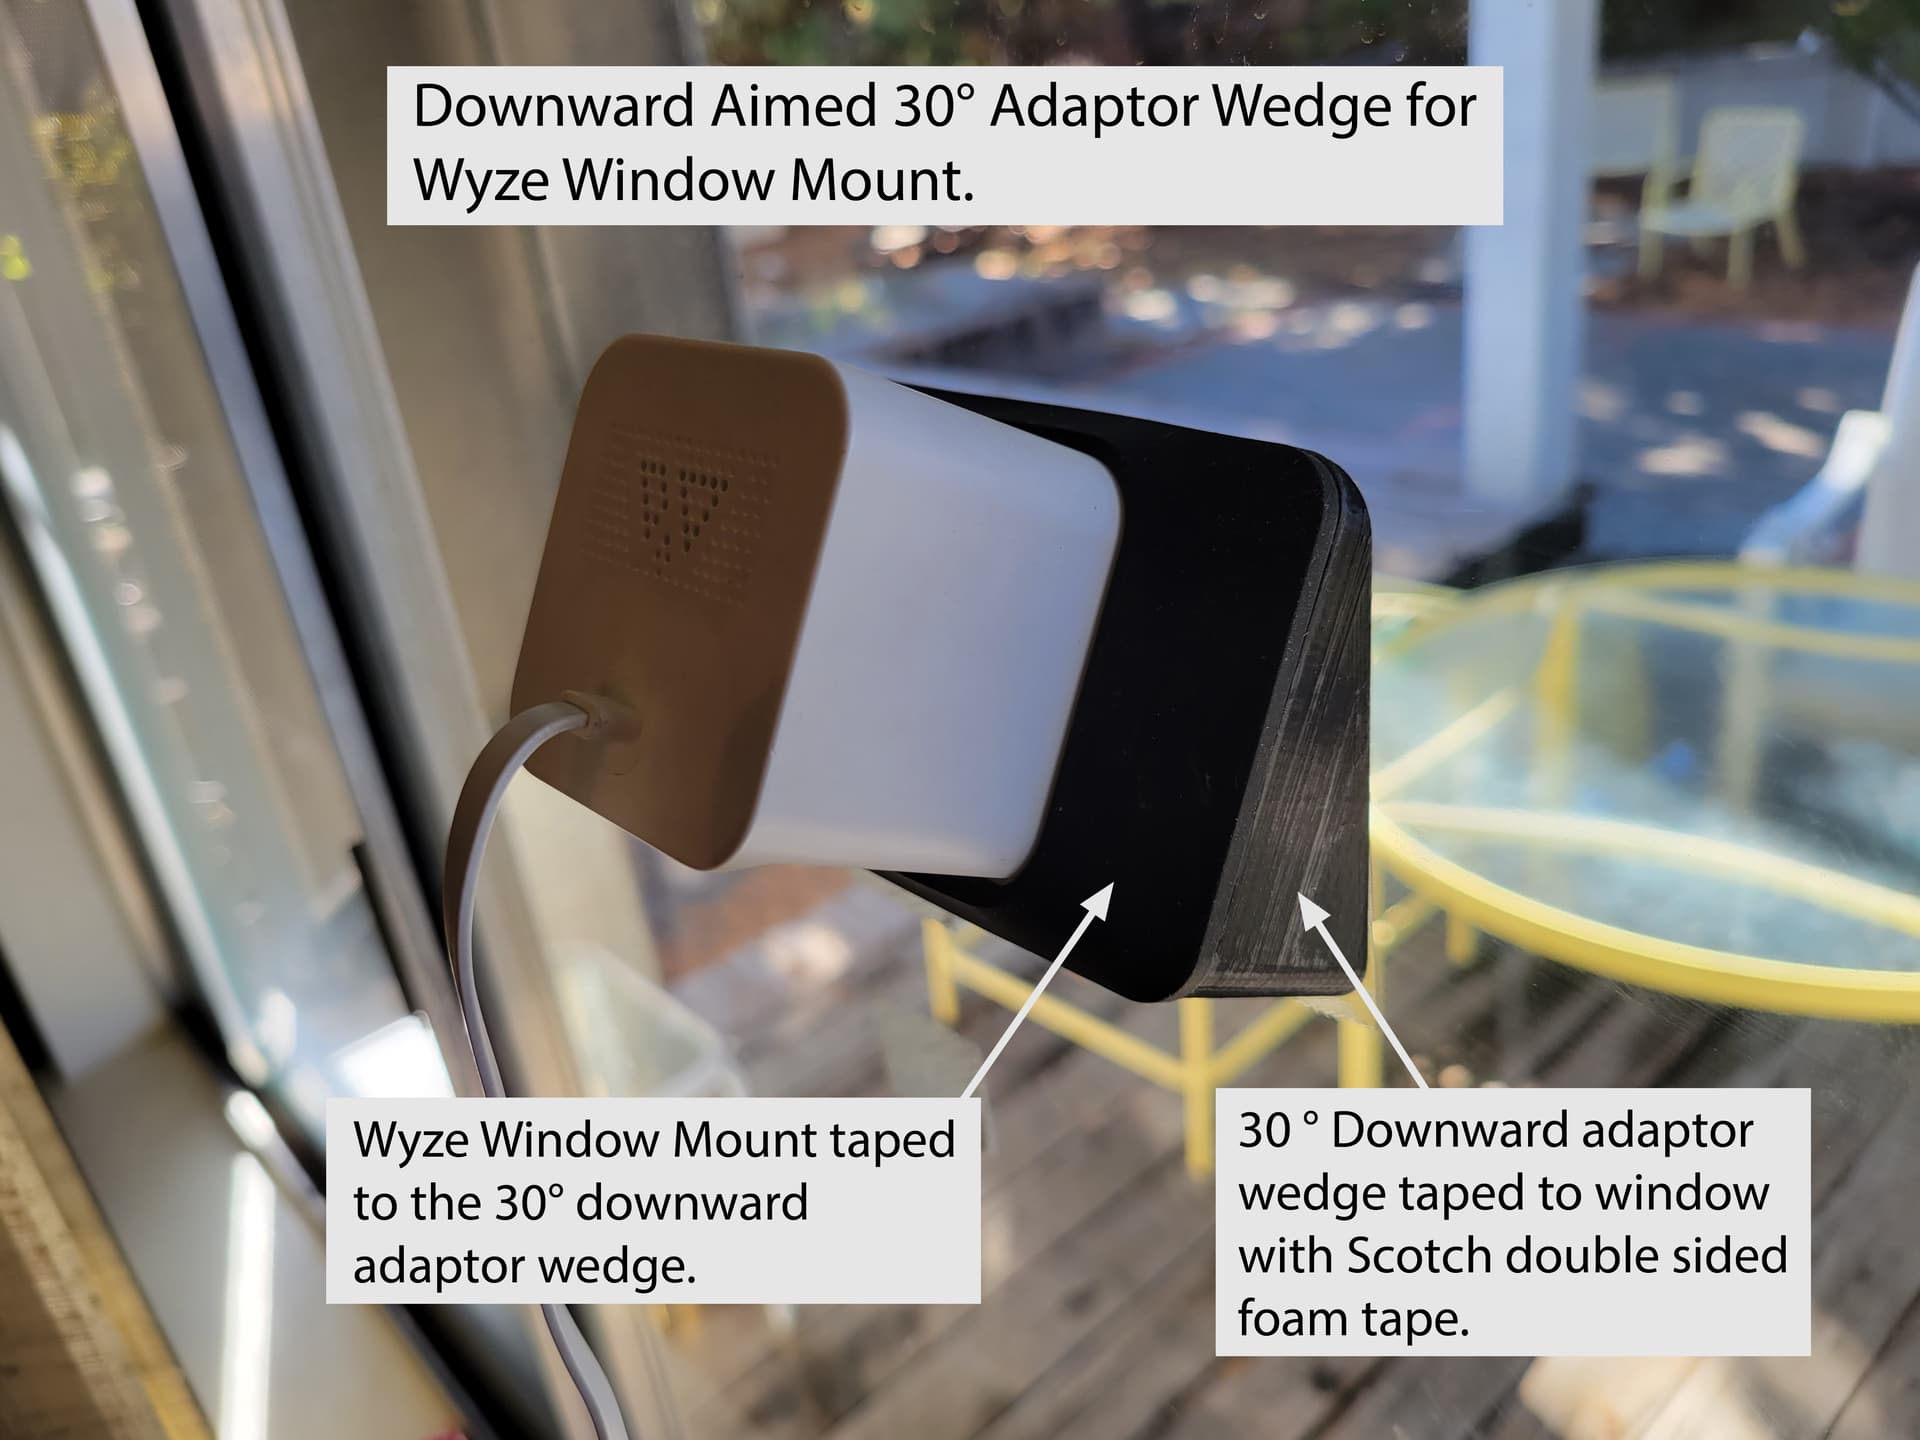
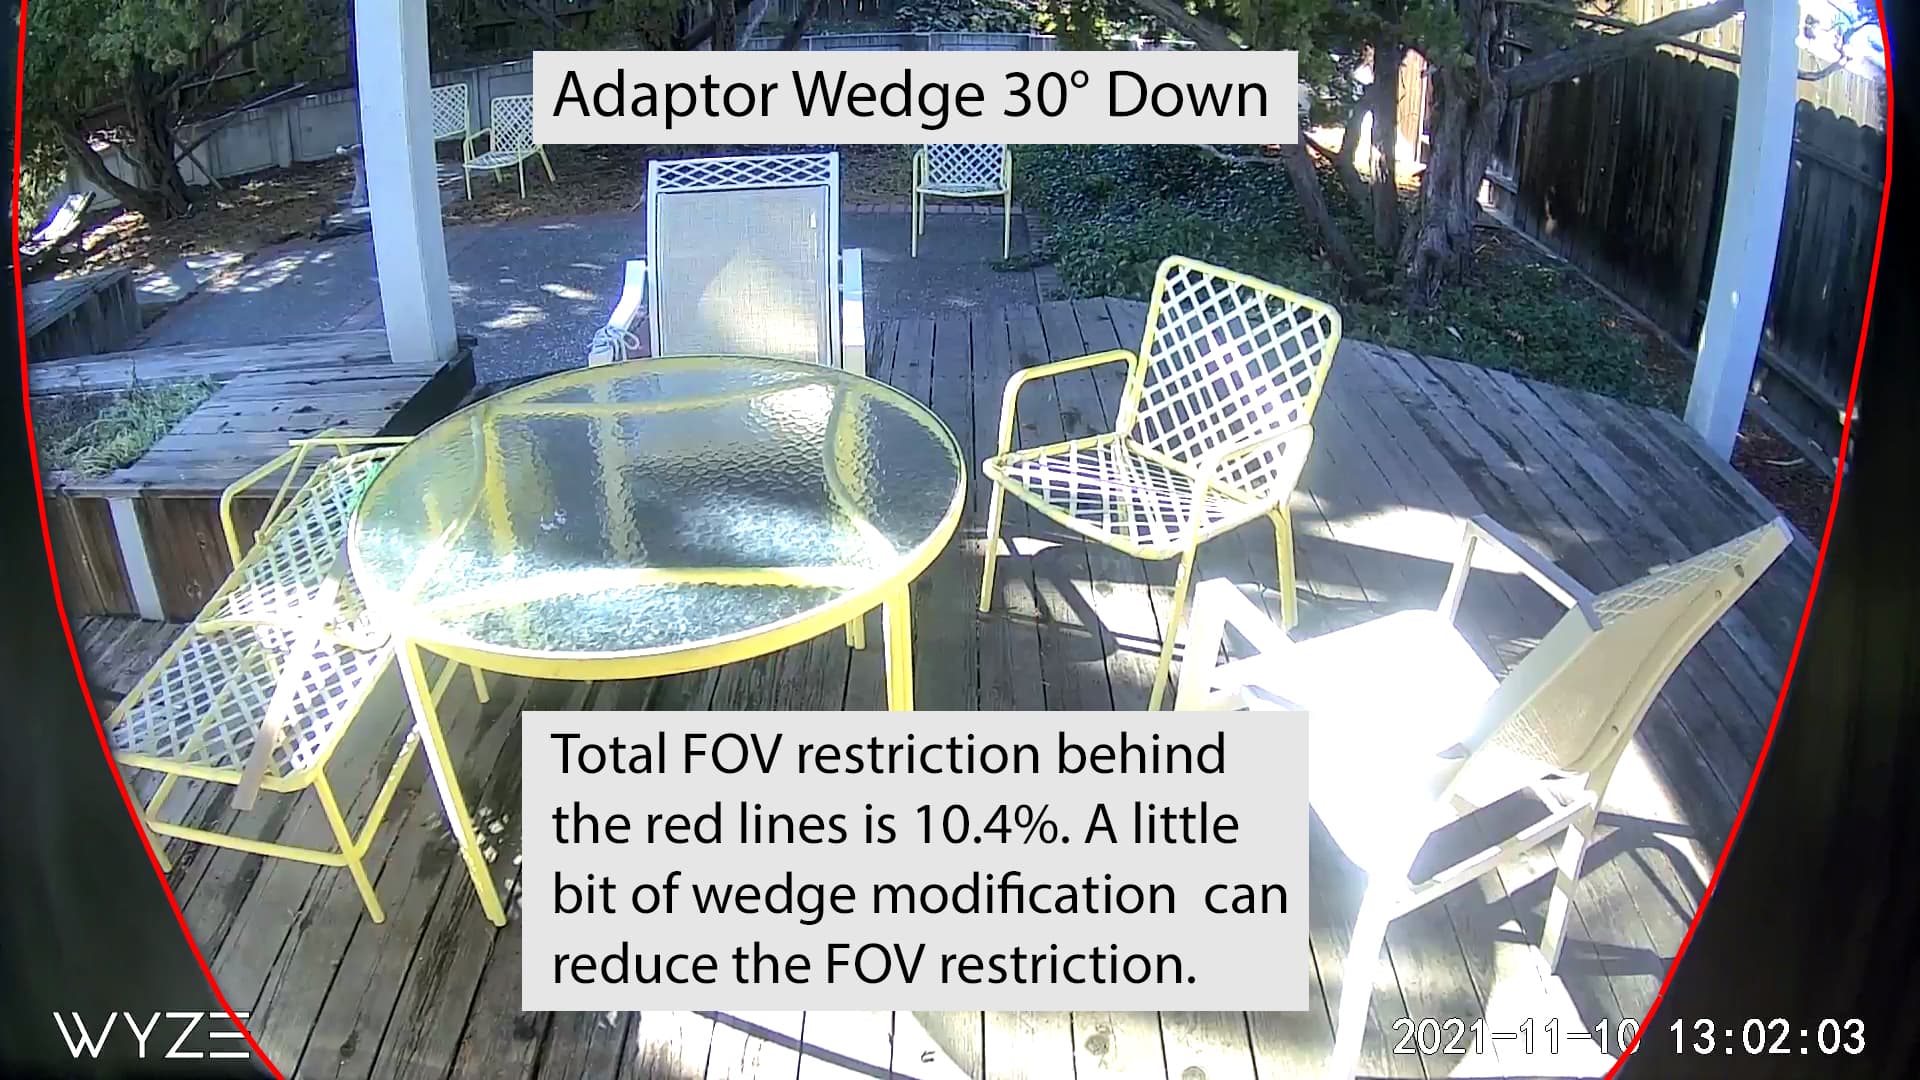
A downward adaptor aiming wedge can be designed for specific angles, however, the geometry of the Wyze Window Mount limits the amount of angle change before VOF (field-of-view) restriction becomes significant. This restriction is caused by the inside surfaces of the wedge adaptor blocking some of the camera’s FOV. I calculate that a 30° down wedge would introduce a 6.5% FOV restriction spread out mostly along the bottom edge and bottom corners of the image.
This is the link to Print a Look-Through-Window at Selected View Angles w Back Light Shield for V3 Camera
This post makes available a selection of left, right, up, and down aim combinations for a different style of rounded square tube glare shields. This post also describes a method of obtaining aim angles. The Wyze Window Mount is not compatible with these glare shields and would have the be used elsewhere.
Let me know if you want me to work up a downward aimed wedge adaptor and at what angle to the nearest 5°. I will make it up for you and everyone else who might want one.
Hello All and @Loughinjhm.
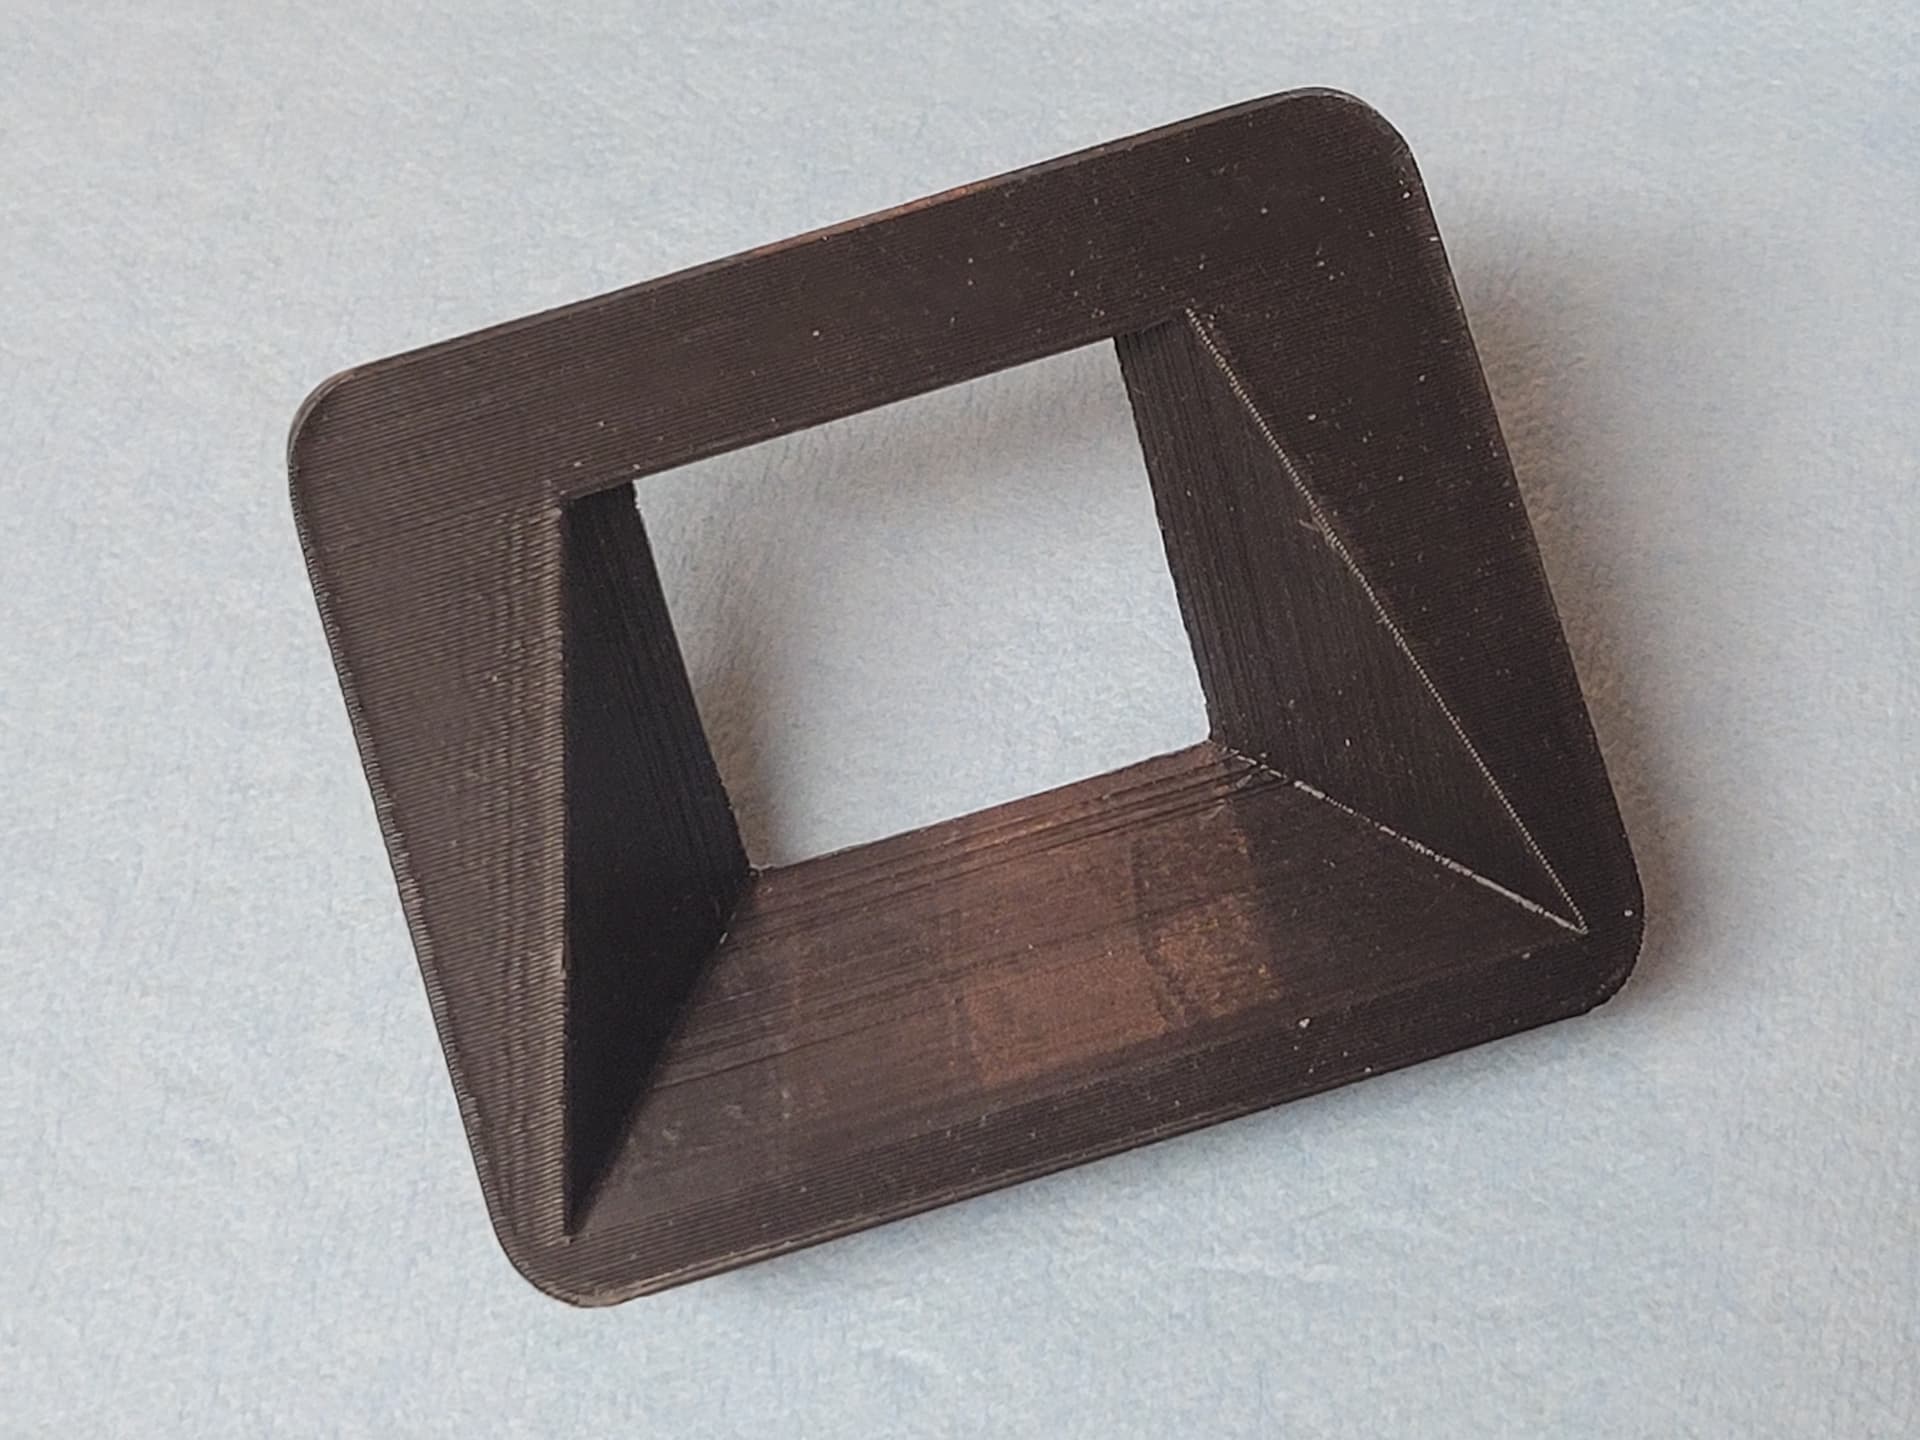
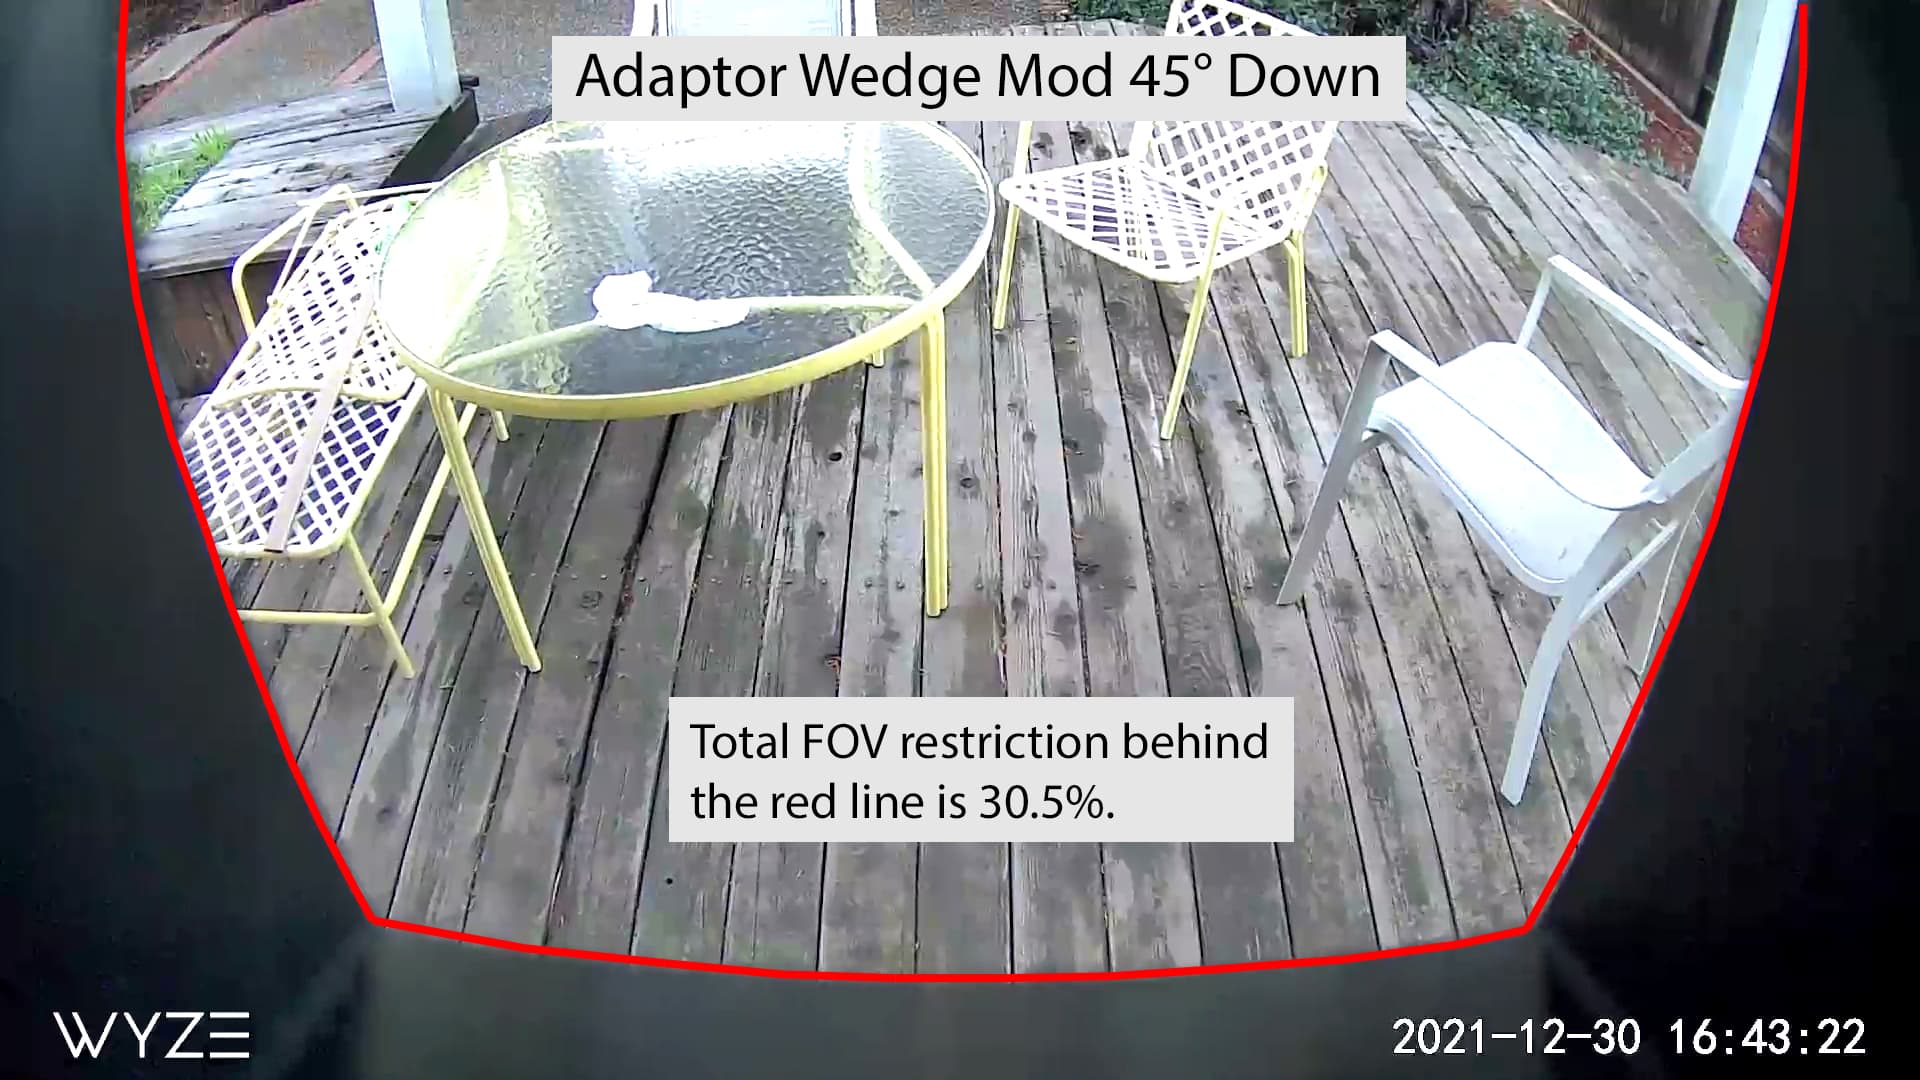
This post is a further response to posts 10 and 11. I decided to draw up an adaptor wedge with a 30° downward aim angle. I had it printed at my local library and tried it out to see how it performed. There was a little more FOV restriction than I anticipated. A little change in the flare angle of the vertical inner side walls will lessen the FOV restriction.
I have not attached a link for its STL file, as I want to incorporate the improvement, then I will provide links to a series of downward aimed adaptor wedges for 5° to 30° in 5° increments.
Hello All.
In my last post about “Getting Aim Angle for Wyze Window Mount Adaptor Wedges”, I mentioned that the 30° Down Adaptor Wedge for the Wyze Window Mount had a little more FOV (Field Of View) restriction than I anticipated and that I would make a modification of it to see how it performs. I didn’t provide any STL file for the downward aiming adaptor wedges. I also didn’t provide a simple way of determining downward aim angles. This post provides what was missing.
The picture below details a simple way to get the down aim angle.
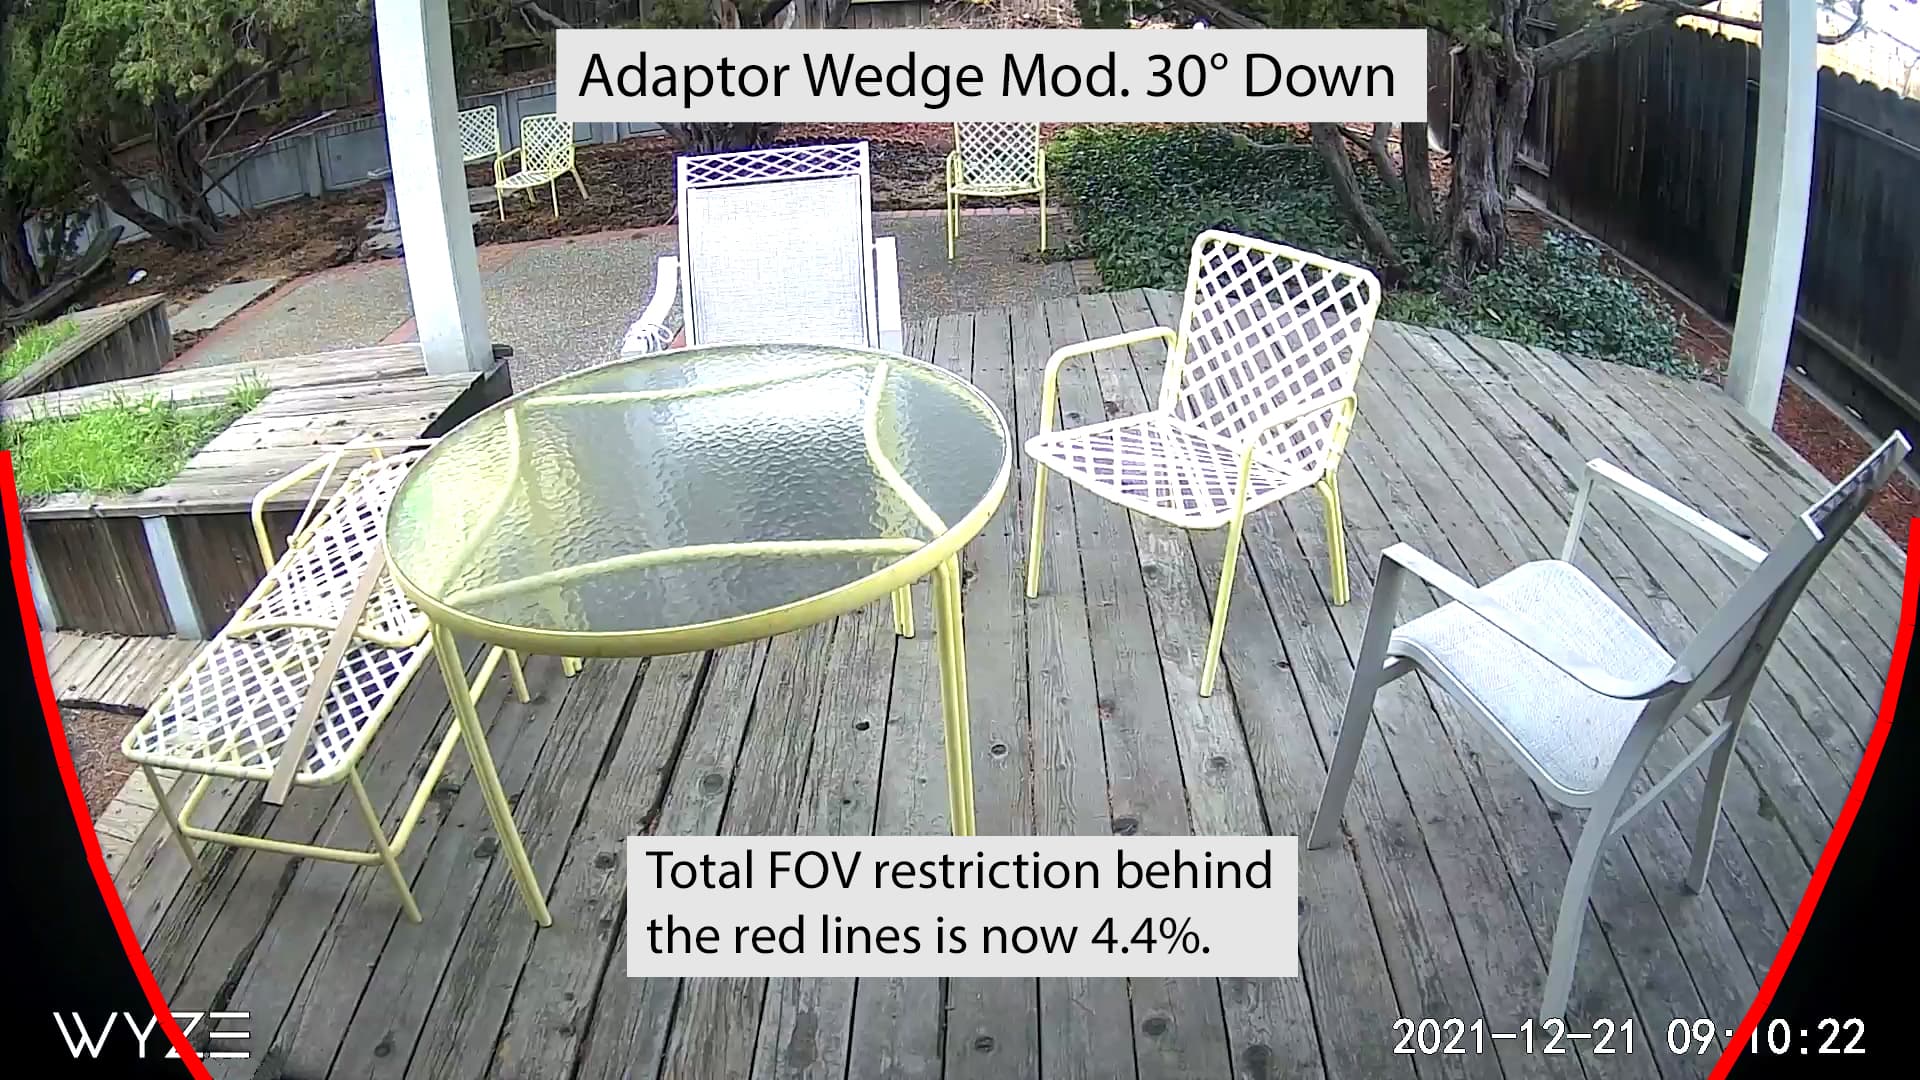
This is about as good a FOV improvement as one can get without further thinning of the lower corner walls. I am having a 45° down wedge printed soon, to see how much FOV restriction there will be. I will post the results. I expect little to no FOV restriction for the 20° downward wedge and none for the 15° to 5° wedges.
Here is the link to nine STL downward wedge files ranging from 5° to 45° in 5° increments, Wyze Window Mount Adapter Wedges 5° to 45° Down . Included in this directory is the PDF file of the paper protractor that was shown in the first picture of this post. These files are free to use as you please.
Hello People.
In my last post, the local library was working on printing out a Wyze Window Mount Adaptor Wedge 45° Down. Today I picked it up and set it up to check it out.
This first picture displays the last three that were printed using the modified design that incorporates the wider bottom flare.
Depending upon the distance from the camera to the area of interest the 45° wedge would still provide head-to-toe coverage. There is plenty of blocked side FOV though.
All of the printable STL files for the Downward aiming adaptor wedges are linked in my previous posts. 45° to 5° in 5° increments, no charge.
Hello @olishansky, @olishansky, @Rulwiz, and @Seapup.
Thank you for your kind ness.
Below is a picture showing a tethering system for the Wyze Window Mount Aiming Wedges you may find applicable for your window camera setup.
@olishansky below is a picture of a recent 3D project my library printed for me. Sorry, they didn’t print the camera. This camera mount is aimed at 20° Right and 30° Down.
The link below is for a window mount for a V3 that is aimed straight ahead horizontally (0°R) and 45° Downward (45°D). Download and print it to see if it will work for you. As you saw in the post you responded to there will be some camera field of view loss. I plan to make available another master directory of 200 or so STL files for window-mounted Full Section V3 camera holders. These files support any combination of aim angles from straight ahead to 45° to the left, right, down, and up in 5° increments. By Full Section, I mean the full camera with its base attached.
FSV3GS 0°R 45°D.stl
The file name is short for Full Section V3Glare Shield 0° Right 45°Down. The 0°R means no angle to the right of straight ahead. In other words straight ahead.
So I just saw this and realized that much of the post was from last year when I wasn’t a member. This is just what I was looking for! Thank you. Our county does have library 3D printing which amazed me when I found out initially. Sometimes we really get to understand where our tax money goes!
Hello @sp0_0ky and All.
There are numerous free 3D viewers and slicer software available for download. All of the ones I used display the bounding dimensions of STL files that are opened. If you press the slice button the amount of filament and time to print will be displayed as well as a slice-by-slice view of the 3D object.
Looking up free slicer software on your browser will bring up a multitude of choices.
Hello @sp0_0ky and All.
I thought I would give you a more specific answer to the question of the sizes of the compound angle window-mounted devices I offered STL files for. The largest item measures in mm 150.3x155.7 at the base and a height of 75.7, the smallest device measures 127x127x20mm. In general the larger the horizontal and vertical angle of the device the larger the height and base dimensions.