I would like to know if and how the chime controller should be hooked up to my existing doorbell chime - picture attached.
I see you have the v1 fuse/resistor connected. Are you upgrading to v2 or duo? Chime controller is not the answer if you are keeping the v1, it doesn’t work on the v1.
Welcome to the Forum, @Its_stok! ![]()
As @fmills1d suggested, we need more information. Answers to some or all of these would be helpful:
- Did you read the Chime Controller Installation Guide?
- What are you trying to install? Specifically, which Wyze video doorbell(s)?
- How many are you trying to install?
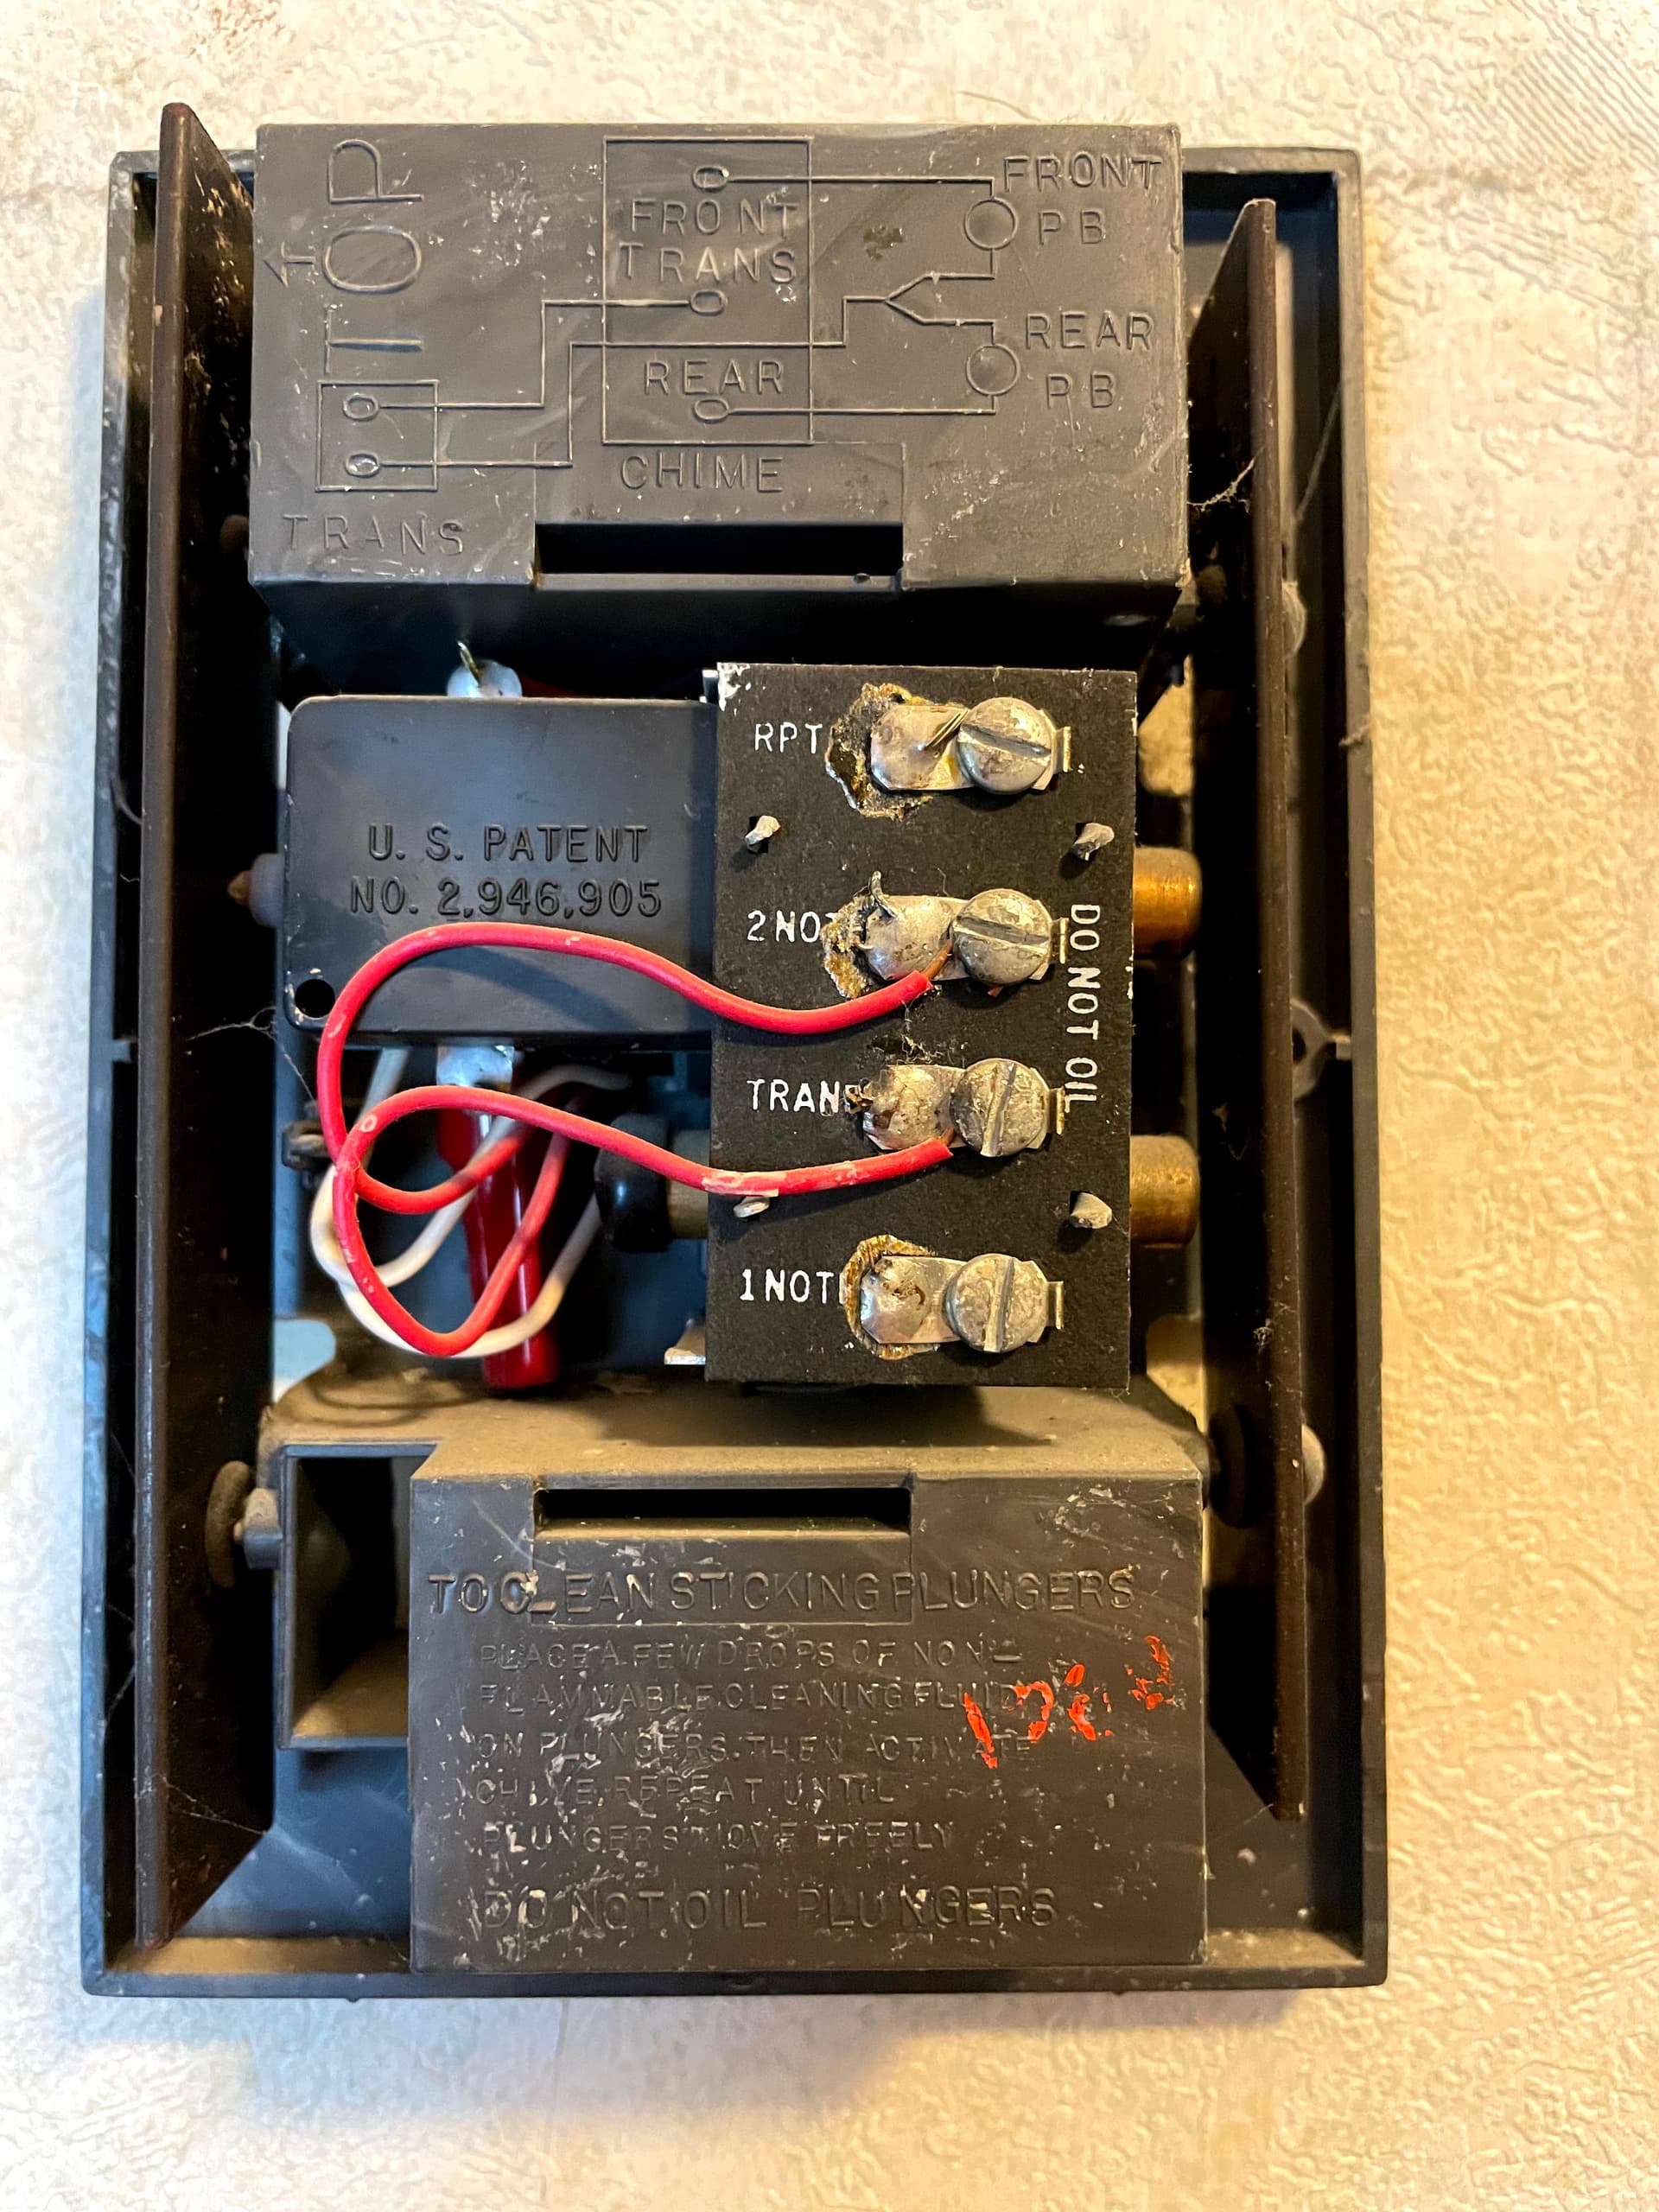
- What is the white wire connecting the two red wires? Is that the jumper/fuse from a Wyze Video Doorbell (Wired) (“v1”), as @fmills1d suggested, or is it something else? (I’m trying not to make too many assumptions.)
- What terminals were the red wires attached to before they were disconnected and the white wire was used to connect them?
Before I go any further, ![]()
![]() I am not an electrician.
I am not an electrician. ![]()
![]()
Best guess without knowing more is that one of the red wires should connect to the TRANS terminal and one should connect to the 2NOTE terminal (if you want a ding-dong! sound from a single Video Doorbell v2 or Duo Cam Doorbell). You can remove that white jumper/fuse (?) wire completely. The question you need to answer before doing that, though, is which red wire comes from your doorbell’s transformer and which comes from your doorbell button’s location, because that matters to Chime Controller.
Ask me how I know…or just read the steps I took to figure this out.
This is the testing I did on my own doorbell's chime box, transformer, and wiring when I was having Chime Controller issues, and it led to my discovery that the wrong wires were connected to FRONT and TRANS before I even started.
[Click to expand/collapse.]
This is copied from Video doorbell V2 chime controller wiring issues - #19 by Crease if you want more information in context.
TL;DR:
I discovered that the red house wire attached to my doorbell chime’s TRANS terminal was actually coming from the doorbell, and the red house wire I’ve had connected to the Chime Controller’s black wire (this red wire which was originally connected to the doorbell chime’s FRONT terminal) was actually coming from the transformer. These had apparently been reversed at the time of the old “dumb” doorbell’s original installation, so I swapped them to their proper locations today.
More Detail:
I installed my own Video Doorbell v2 roughly 11 months ago using the standard wiring installation for the Chime Controller, and everything worked as expected from that time until a couple of months ago, when the chime stopped ringing with a button press. I tried a number of the typical troubleshooting steps and eventually got the chime ringing again somewhat reliably by using the alternate wiring instructions, but the ding-dong! is often accompanied by an unpleasant rattle/hum sound. Wyze Support says that “the buzzing/clicking sound on the chime is normal when an alternative wiring method is used”, but this seems odd to me, and trying to think my way through @fabron72’s wiring situation got me to explore and reevaluate my own doorbell wiring situation, so now I have a better understanding of what’s going on.
This is what I did:
- Tested the voltage at my 10VA/16V transformer and read 18.5 V AC.
- Turned off power to my doorbell.
- Disconnected the house wires in my chime box and labeled the red wire (what I believe would equate to one of @fabron72’s black wires) that was attached to the TRANS terminal. (I wrote “Transformer” on a piece of tape to differentiate it from the other red wire.)
- Untwisted the white wires in the chime box that have been twisted together and capped with electrical tape.
- Clipped a test lead to the red and white wires at my transformer, effectively shorting across them (probably unnecessary).
- Attached my multimeter to the red “Transformer” wire and its paired white wire (as they come into the box through the same insulation sheath), put it in resistance measurement mode, and turned it on, where it settled on “1”, even after double-checking all my connections. Oops.

- Attached the multimeter to the other red wire (the one that was initially on the FRONT terminal and has instead been twisted together with the black wire from the Chime Controller) and its paired white wire and tested resistance to get a realistic reading of conductor resistance (which I didn’t record). This is the actual wire pair coming from the transformer!

- Removed the Video Doorbell v2 from the wall and disconnected the wires so that I could test resistance again with that air gap and with a test lead clipped across the wires in order to confirm that the red wire which has been connected to TRANS this whole time is actually coming from the doorbell-side wire pair.
- Reattached the multimeter to the actual transformer wire pair (now that I know which it is), put it in AC voltage measurement mode, restored power to the doorbell, and turned on the multimeter, which read 18.9 V, confirming that this is actually the transformer wire pair.
- Turned off doorbell power again.
- Reattached and remounted Video Doorbell v2 outside.
- Rewired my chime box:
- Twisted the two white wires back together, taped the exposed conductors to insulate them, and tucked them out of the way.
- Attached my known transformer red wire to the TRANS terminal along with the red wire from the Chime Controller.
- Attached the white Chime Controller wire to the FRONT terminal.
- Twisted the black Chime Controller wire together with the remaining red wire (the false “Transformer” wire that I now know is actually coming from the doorbell) after removing my temporary tape label.
- Restored power to the doorbell, waited for it to boot up and load a video stream to the Wyze app, and then tested by pressing the button to get a nice ding-dong! from the house’s built-in chime now that the wiring is correct and the Chime Controller is wired back with its true standard wiring installation.
In your case, unless you installed that white wire yourself and know what the “before” picture was like—and which red wire previously went to which terminal—then I’d recommend doing some testing.
Once you figure that out and have one red wire connected to TRANS and one connected to 2NOTE (so that you know your doorbell chime functions correctly with a regular “dumb” doorbell button press) you should be able to install Chime Controller like this:
- Connect Chime Controller’s red
 wire to the TRANS screw terminal along with the correct existing red transformer wire. (You should have two wires connected to this same screw terminal.)
 - Disconnect the other existing red wire from the 2NOTE screw terminal. Connect Chime Controller’s black
 wire to this free red wire with a wire nut.
 - Connect Chime Controller’s white
 wire to the 2NOTE screw terminal.
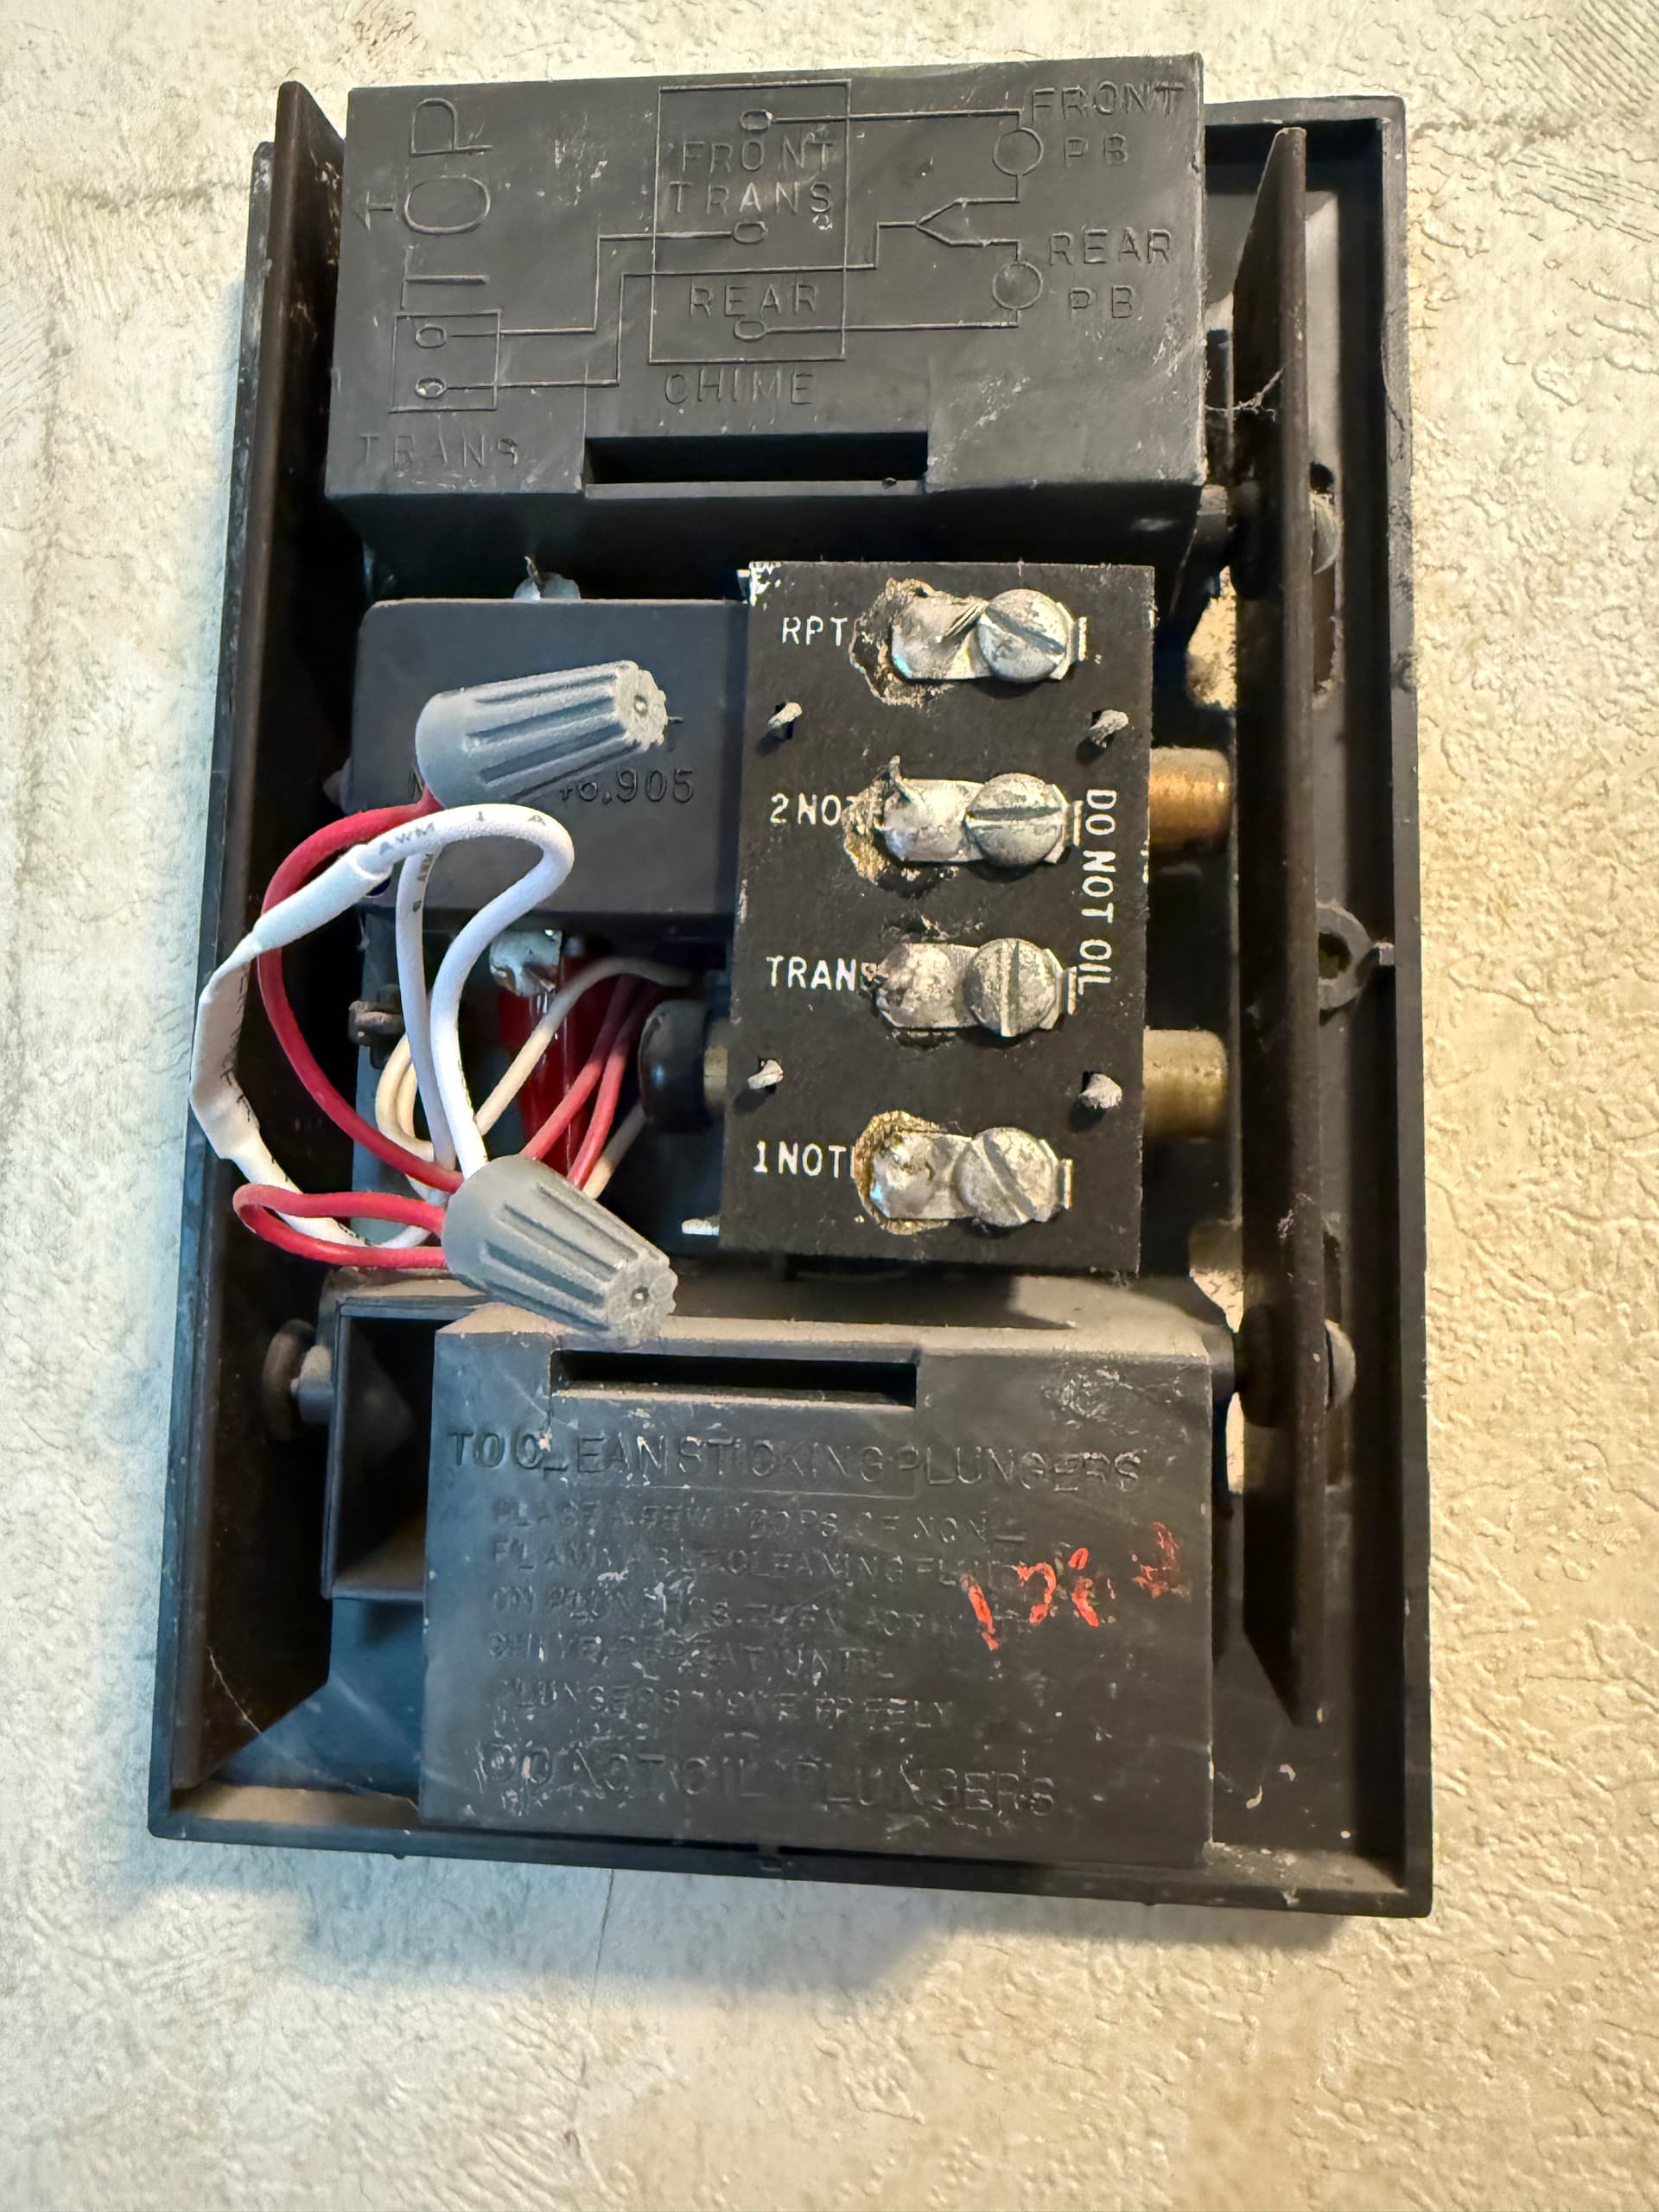
I’m not sure what the RPT terminal is on that chime. That’s a mystery to me, and I haven’t yet found a good source of information about that online.
We also haven’t even addressed your transformer situation. That’s something else I’d want to know about before starting this, but you didn’t really give us much to go on, so I don’t really know where you are in this project. Answering the initial questions above would be a good start.
Thanks for providing such a clear photo, by the way! That’s very helpful! ![]()
2 Likes
Without any wires connected to terminals in the chime box and the white fuse wire connected in a by-pass manner, and also because I had duel v1’s, an assumption would be more correct than you think. Unmistakably a v1 fuse. As you have seen, I generally take a simplistic first approach with inquiries, although I very much admire your thorough and detailed (encyclopedic ![]() ) responses. [Carverofchoice still in the lead
) responses. [Carverofchoice still in the lead ![]() ].
].
1 Like
Thank you for all the replies. I do have a v1 Wyze doorbell and I am interested in going with a v2. I also did find a “before” picture of my old doorbell chime.
1 Like
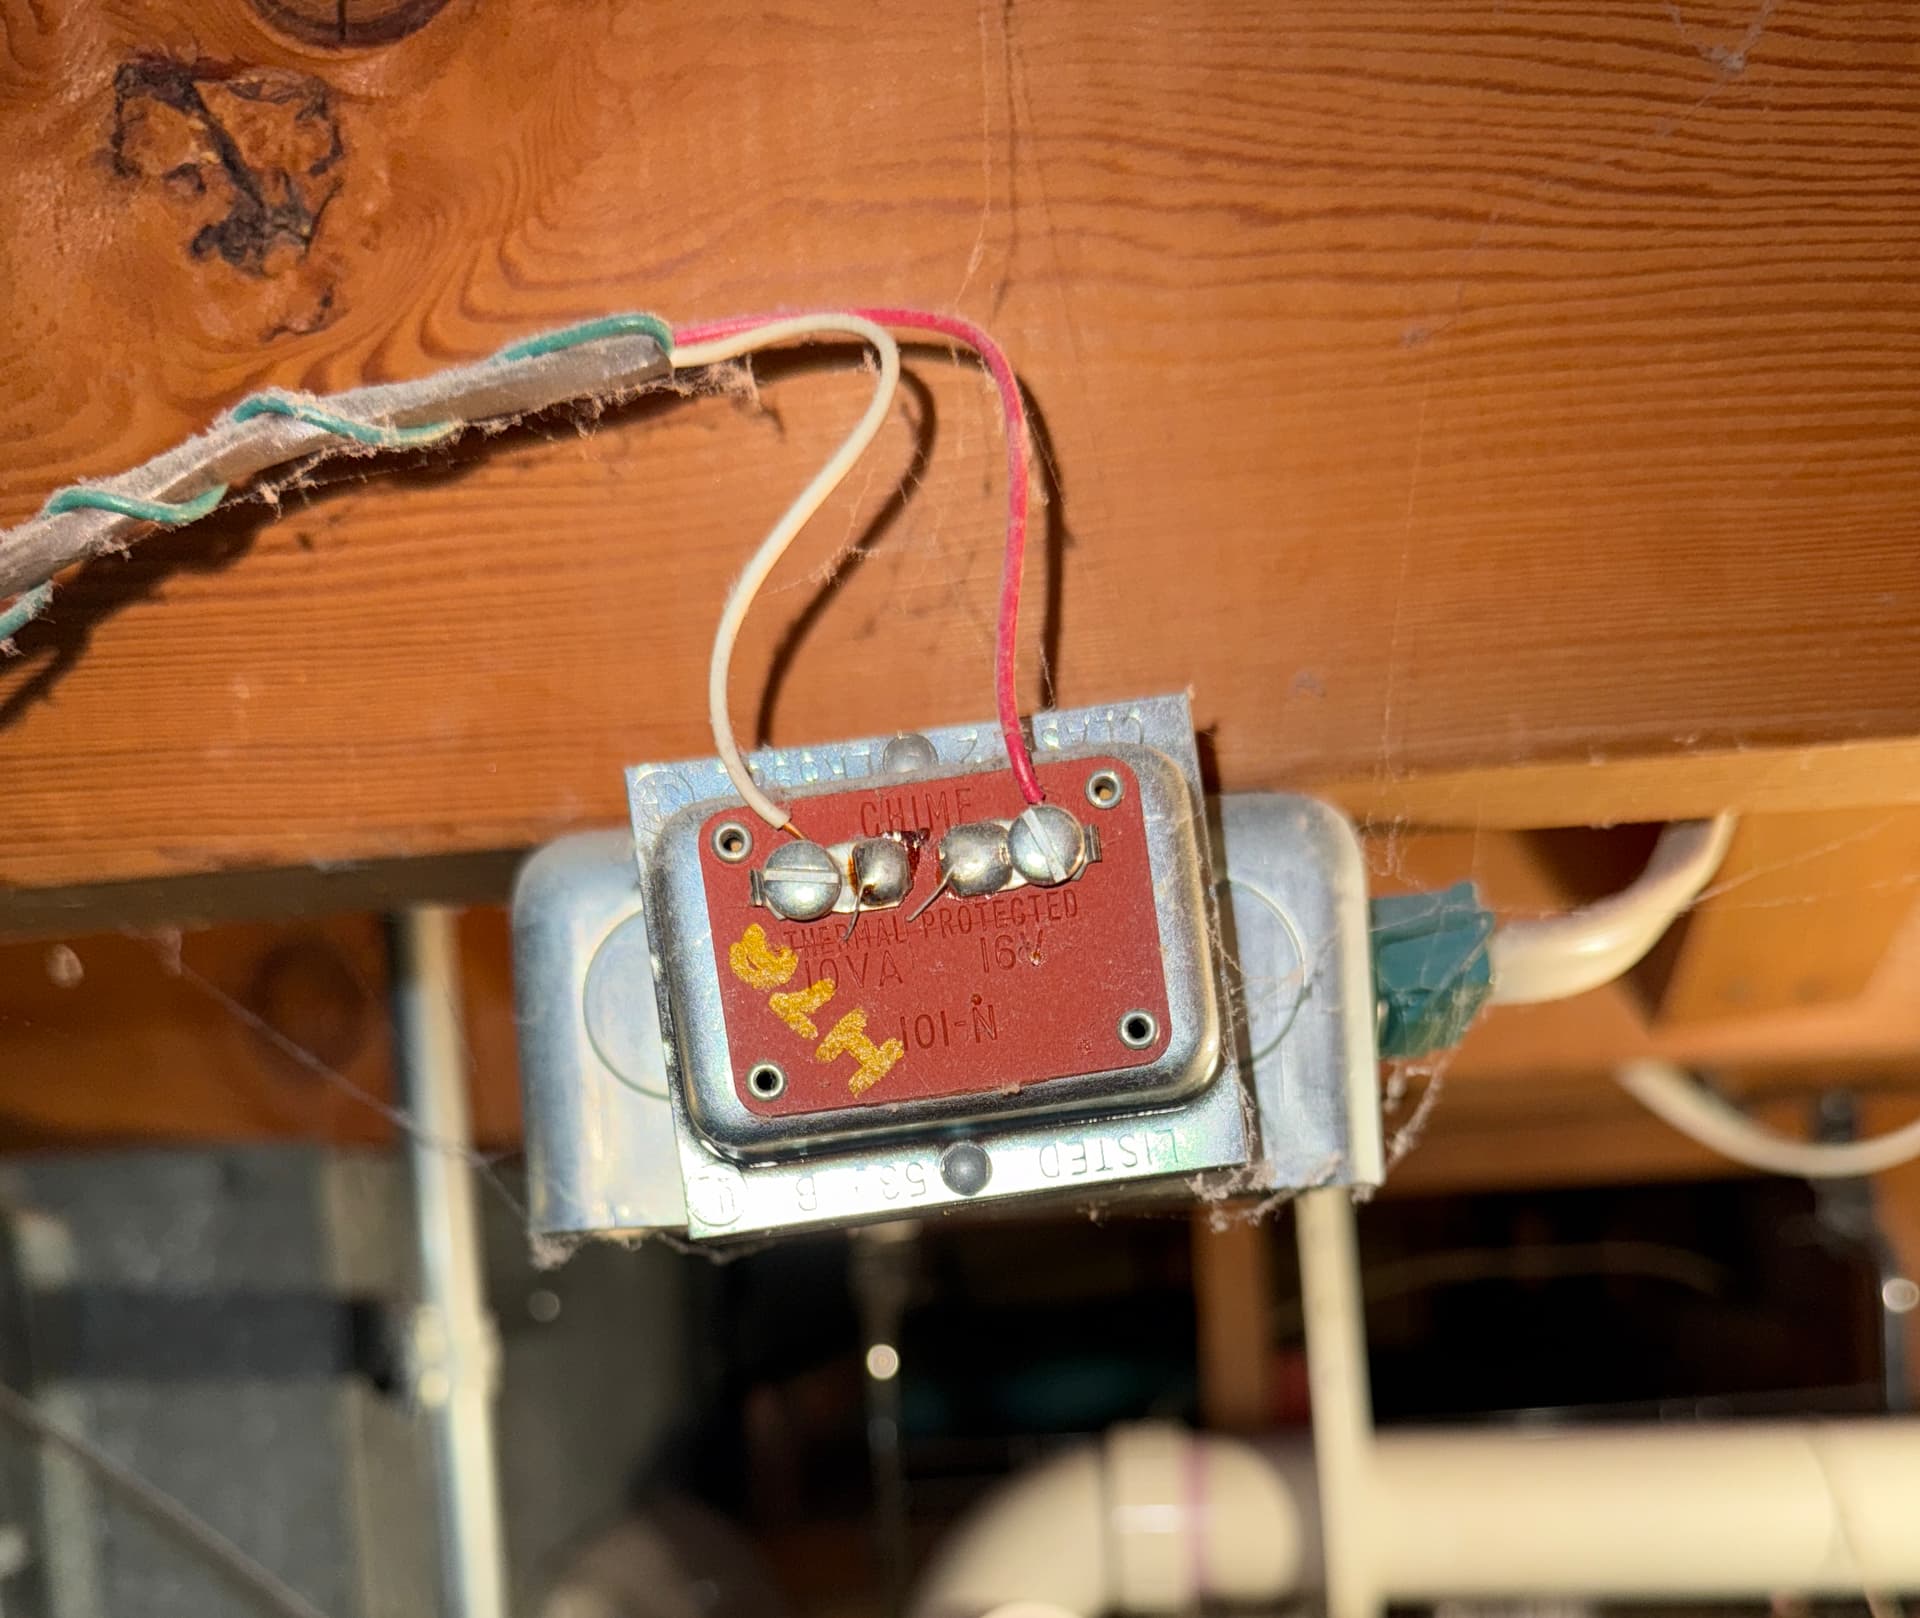
I have added picture of my transformer and the “before” picture. Thanks for your help!
@fmills1d, I get what you mean, and I’m not discounting your experience at all. I just try to approach the problem solving with an open mind and consider that perhaps the white wire was from something outside the Wyze ecosystem. I’ve dealt with non-Wyze devices that also require installing something in the chime box, so I was leaving open the possibility that this could be something like that and that maybe @Its_stok is just now switching to Wyze. ![]()
You’re welcome, and I see those, which are both very helpful! Thanks! ![]()
The transformer should have adequate output for Video Doorbell v2, which Wyze says requires 16-24 V AC, ≥10 VA. Your 16 V AC, 10 VA transformer should be fine, especially for a single video doorbell. That’s what I’ve used to power my Video Doorbell v2, and it’s been mostly fine. (I’ll get back to that below.)
If you have the ability to test (i.e., with a multimeter), then I think that’s even better, but that’s because I like knowing what I’m dealing with before getting too deep into a project and also having the ability to test and learn along the way. I understand that not everyone wants to mess with that, but it’s something I like to recommend up front because it doesn’t take a lot of additional effort, and I think it can be helpful in understanding a system and potentially preventing some future headaches.
The “before” picture is especially awesome! I think a lot of people wouldn’t have that or be able to find it so quickly (if at all), and what you shared is clear and seems to show the red wires in roughly the same orientation now compared to before. Great job! ![]()
If the wires really are the same and were actually attached to the correct terminals before you installed your “v1” doorbell, then this is how I’d install a Chime Controller for Video Doorbell v2 (or even Duo Cam Doorbell if you wanted to do that):
- Disconnect the bottom wire nut (closest to the 1NOTE terminal). Connect that red wire and Chime Controller’s red wire to the TRANS terminal.
- Disconnect the top wire nut (closest to the RPT terminal). Connect that red wire with Chime Controller’s black wire using a wire nut. Save the now-free white jumper/fuse wire with your other “v1” doorbell stuff.
- Connect Chime Controller’s white wire to the 2NOTE terminal.
That should work, but it presumes that the red TRANS and 2NOTE wires are what we think they are, and this is what I was alluding to earlier. I had a similar situation where I installed Video Doorbell v2 and Chime Controller and had them working for months without significant issue, and then at some point the chime would no longer ring whenever the doorbell button was pressed. I did a bunch of troubleshooting, including trying Wyze’s alternate wiring instructions[1] for Chime Controller. Wyze eventually sent me a replacement doorbell and told me I could recycle the one I already had. Instead, I did my own testing (outlined in the “Click to expand” section of my previous post) and discovered that my home’s chime box had the wrong wires going to the TRANS and FRONT (which corresponds to 2NOTE in your case) terminals. Once I figured that out and got the correct wires connected to the right terminals, that solved my problem with my original doorbell and controller, so the replacement has been sitting in its box as a backup (though I did connect it to make sure it works, too).
I say all that because I hope other people can learn from my experience and avoid some future problems. Even if you have your home’s red wires switched now and connect Chime Controller the way you think it should be connected, it might work for a while and stop, and then you’d have to figure out why. I think it’s better to test and have confidence about what you’re dealing with at the beginning so that you don’t have to mess with that stuff later.
I hope that all makes sense! Feel free to ask other questions or let me know if I can clarify anything.
Normally I’d link those here, but I don’t want to cloud the issue. You can find those in the Help Center if you’re curious, but I wouldn’t bother with them at this point. ↩︎
This topic was automatically closed 90 days after the last reply. New replies are no longer allowed.